Learn how to make a quilt step by step. I’ll teach you everything about making a quilt, so you can make your first quilt in no time!
Making a quilt for the first time can be super confusing. Piecing, basting, making a quilt sandwich (what on Earth…?), binding… It feels like there are so many techniques to master and you have no idea where to start.
If you feel confused and overwhelmed with how to make a quilt, don’t worry. I know exactly how you feel because not so long ago I was right where you are now.
That’s why I’ve decided to put together a comprehensive guide on making your first quilt. It will show you every single step of making a quilt.
We have many in-depth articles for each of the steps on the blog, so I’ll link to them wherever I see fit. This way you can get even more information on each step of the process.
Are you ready? We’re diving right in! Let’s take a look at how to make a quilt step by step.
- Step 1: Choose a Quilt Pattern
- Step 2: Choose Fabric for Quilting
- Step 3: Gather Quilt Supplies
- Step 4: Make the Quilt Top
- Step 5: Square up the quilt top (if Needed)
- Step 6: Add borders (optional)
- Step 7: Prepare the Backing Fabric
- Step 8: Prepare the Batting
- Step 9: Baste the Quilt for Quilting
- Step 10: Quilt
- Step 11: Square up the quilted Sandwich
- Step 12: Bind the Quilt
- Advanced Quilting Techniques
Step 1: Choose a Quilt Pattern
The first step in making a quilt is to choose a quilt pattern.
You can find quilt patterns in books, magazines, and of course, on the internet. There are so many amazing pattern designers out there who offer their patterns in their online shops (like our little pattern shop here). The great thing about buying patterns online is the fact that you get the download instantly and can access the pattern anytime from your phone or laptop.
An excellent place to start your search is our round-up of 100+ Modern Patterns for Quilts – many of these are absolutely free!
There are many different quilt patterns to choose from, including traditional, modern, and contemporary designs. When choosing a quilt pattern, consider your skill level and the amount of time you have available to work on the project.
If you’re a beginner, I recommend sticking to very simple patterns, like our Deep Diving pattern (pictured below).

Another great option is a simple patchwork quilt made of squares. You can make it using a precut fabric bundle like a charm pack to skip the cutting part of the process. This will make your first project even easier. If you want to make one like ours in the picture, follow our free Simple Patchwork Quilt Tutorial.

Of course, you can also design a quilt pattern on your own! We have some great tutorials that will help you design the basic quilt top elements as well as whole quilt tops.
You can start with our basic quilt block tutorials: learn how to make flying geese, how to make half-square triangles and how to sew quarter square triangles.
Then you might need to figure out how many blocks you need for your quilt top. And if you want you can add sashing – learn how to calculate sashing yardage here – and/or borders. We’ve got you covered with guides on calculating yardage.
And when it comes to the math, no need to stress—our Quilt Geek quilting calculator app handles all the calculations for you, so you can focus on designing and enjoy the quilting process instead!
With the right tools and a little creativity, the possibilities are endless!
If you’re looking to get inspired, we’ve got some great articles with amazing (free and paid) quilting patterns:
- Minimalist Modern Quilt Patterns
- Modern Free Scrap Quilt Patterns
- Modern Quilt Strip Patterns
- Baby Quilt Patterns
- Modern Half Square Triangle Quilt Patterns
- Inspiring Mountain Quilt Patterns
- Yellow Brick Road Quilt Patterns
- Bear Paw Quilt Patterns
- Ohio Star Quilt Patterns
- Pinwheel Quilt Patterns
- Bird Quilt Patterns
- Log Cabin Quilt Patterns
- Jelly Roll Quilt Patterns
- Modern Lone Star Quilt Patterns
- The Double Irish Chain Quilt Pattern
- Traditional Quilt Blocks and Patterns
Traditional Quilt Patterns Turned Modern
- Traditional Quilt Blocks and Patterns
- Modern Star Quilt Patterns & Star Quilt Blocks
- Yellow Brick Road Quilt Patterns
- Bear Paw Quilt Patterns
- Ohio Star Quilt Patterns
- Pinwheel Quilt Patterns
- Log Cabin Quilt Patterns
- Modern Lone Star Quilt Patterns
- The Double Irish Chain Quilt Pattern
Seasonal Quilt Patterns
- Fall Quilt Patterns
- Spring Quilt Patterns
- Summer Quilt Patterns
- Winter Quilt Patterns
- Halloween Quilt Patterns
- Christmas Quilt Patterns
Nature-Inspired Quilt Patterns
Choose the Size of The Quilt
Another thing to keep in mind when choosing the quilt pattern (or designing your own) is the size you want your quilt to be. Quilts come in different sizes (and shapes), so if you want to make a specific pattern, make sure it is available in the size you require.
For some help on standard quilt sizes, read our guides:
Step 2: Choose Fabric for Quilting
Once you have chosen a quilt pattern, the next step is to select the fabric that you will use to make the quilt.
Best Fabric for Quilting
The best fabric for quilting – especially for a beginner – is 100% cotton fabric.
I recommend purchasing quilting cotton as this will surely produce good results. If possible, choose high-quality quilting cotton as this can make a big difference in the finished product of your quilt.

The easiest way to ensure you get good quality fabric is to choose a trusted brand. Many reputable fabric manufacturers produce high-quality quilting cotton. Some popular brands are Robert Kaufman, Moda, Riley Blake, AGF, PBS Fabrics, and others.
Choose the Color Scheme
Of course, the other thing to consider when selecting fabric is the quilting color scheme.
Selecting a color scheme for a quilt is an important step in the quilting process. It can greatly affect the overall look and feel of the finished product. When choosing a color scheme, consider who the quilt is for and what colors they like.
Also, think about where the quilt will most likely be used. Are there any dominating colors in that space that you want to include in your quilt?

We have some great resources for learning to choose the right colors for your quilt. I recommend you begin by reading our Quilter’s Color Wheel guide. Then take a look at the different quilting color schemes in action with some stunning quilt examples.
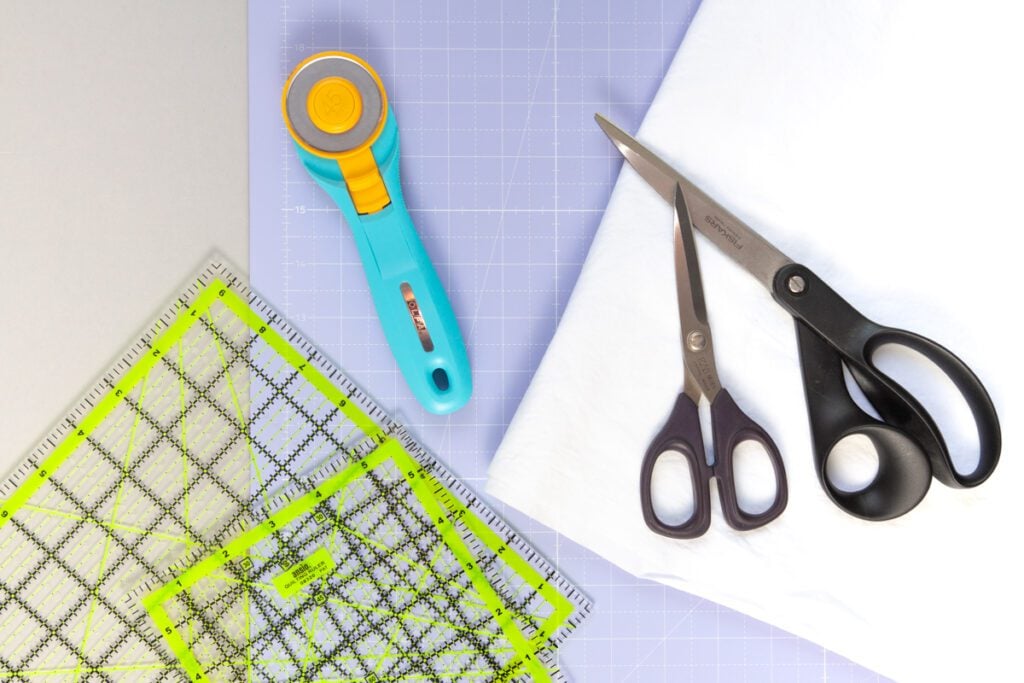
Step 3: Gather Quilt Supplies
After you have chosen a quilt pattern and selected your fabric, it is time to gather the necessary quilt supplies. Some of the basic supplies you will need include:
- rotary cutter, cutting mat, and quilting rulers
- sewing machine and needles
- thread
- scissors
- pins
- needles
- batting
- quilting hoop or frame (if hand quilting)
- iron and ironing board
- fabric marking tools
If you’re new to all of this, you might want to check out our list of Quilting Supplies for beginners which will help you figure out which supplies to get first and which can maybe wait a bit.
You may also need additional supplies depending on the quilt pattern and the quilting technique you choose. For example, if you plan to machine quilt your quilt, I highly recommend having a walking foot for your sewing machine.
Step 4: Make the Quilt Top
Once you have your pattern, your fabrics, and your quilt supplies, it is time to cut and piece the quilt top. There are many different techniques that can speed up the process (we’ll discuss some of them after the tutorial here).
But if you’re a beginner, I would recommend following the instructions in the chosen quilt patterns. As you get more experienced, you can start testing different techniques of construction.
1 – Cut your fabric
Follow the instructions provided in your quilt pattern to cut your fabric into the correct sizes and shapes. The easiest way to do this is using a rotary cutter, quilting rulers, and a cutting mat, which produces nice accurate cuts. It also speeds up the process, as you can cut multiple pieces with one single cut. So save those sewing scissors for other sewing projects.

Make sure you are as accurate as possible when cutting. If you’re off by just a little bit it can really cause problems in the next step – the assembly of the pieces.
2 – Sew the pieces together
After you have finished cutting your pieces, it is time to sew them together to form the desired designs. Again, follow the instructions from the pattern you are using to make sure you use the correct order and stitch the pieces together according to the design.
For piecing, patterns usually call for a scant ¼’’ seam. This means that you want your seam to be just a smiiiidge less than ¼’’ away from the edge of the pieces you are sewing together.

A great way to make sure you are using a scant ¼’’ seam is to sew a test piece. Sew together two pieces and measure the distance between the seam and the edge of the fabric. Once you’ve found the perfect position, you can mark that line on the sewing machine (where you need to align the edge of the fabric to get the perfect seam) with a strip of washi tape.
Another option is to use a ¼’’ presser foot. Some sewing machines come with this attachment included. If yours doesn’t you can get a ¼’’ presser foot as an accessory, just make sure you get one that will fit your machine make and model. Even with a ¼’’ presser foot, I suggest you test out the seam allowance and move the needle a bit to the left or the right if the seam allowance is not to your liking.
Read our scant 1/4” seam allowance tutorial to learn how to get that perfect seam allowance!
Before starting to stitch also check the stitch length setting on your sewing machine. I like to use a shorter stitch for piecing. The default stitch length is usually 2.4, and for piecing, I like to set my length at 1.8.
Depending on the pattern you are making you might be instructed to first piece together individual blocks and then sew those together into the final design. Follow the instructions provided to create the finished quilt top.
A very useful tool when constructing a quilt top is a quilt design wall. A design wall is a large vertical surface covered with a special fabric or batting that allows quilt blocks to stick to it. We have a tutorial on how to make a DIY design wall on the blog.
3 – Press the seams
Pressing seams is an important part of the piecing process because it helps to set the seams and create a crisp, flat quilt top. I always press all my seams as I sew them. This way I know I’ll have nice flat seams throughout the quilt top.

The main thing to remember here is that in quilting, you don’t iron, you PRESS. This means that instead of sliding the iron left and right (which would cause the little pieces and seams to distort), lightly press the hot iron down onto the seam. Then lift the iron and lower it to another part of the seam.
Generally, we recommend pressing the seams to one side – towards the dark fabric. Depending on which pattern you are making, there might be different instructions given for that specific design.

For example, in the simple patchwork quilt pictured above, I am pressing each row in the opposite direction. This ensures the seams nest when we sew the rows together.
Make sure you read the pattern and follow the instructions carefully.
Step 5: Square up the quilt top (if Needed)
Sometimes the pattern is constructed so you need to cut off some fabric. This is usually true for diagonally constructed patterns, like you see in the picture below where I’m squaring up the Mirror Maze quilt.

Even if you’re making a block-based quilt top your quilt top might be a bit distorted. This is nothing to worry about and totally normal. This distortion happens if you’re not using a consistent seam allowance or are a bit inaccurate when assembling the blocks. To check if there’s any distortion, measure the diagonals to see if they are more or less the same. If they’re not, you’ll need to cut off some more fabric on the corners intersected by the longer diagonal.
Align the ruler with one edge of the quilt top, making sure the ruler is straight and the fabric is flat. Cut along the edge of the ruler with the rotary cutter.
Rotate the quilt top 90 degrees and repeat the process of aligning the ruler and cutting along the edge to trim off any excess fabric. Repeat this until you’ve trimmed all four sides of the quilt top.
Step 6: Add borders (optional)
Adding borders to your quilt top is definitely not obligatory – and honestly, we very rarely do. However, there are certain situations and quilts that you want to add borders to.

Quilt borders can be an excellent way to frame the quilt or introduce additional design elements that complement the quilt top. Borders are also a great way to make the quilt top a bit larger and add stability to the quilt by preventing the edges from stretching or distorting during the quilting process.
If you decide to add borders to your quilts, we’ve got a quick overview of how to do it, and some great modern quilt border ideas in this article: 8 Modern Quilt Border Ideas You’ll Want To Make!
Step 7: Prepare the Backing Fabric
Once the quilt top is complete, it is time to prepare the backing fabric. This is the fabric that will be seen on the back side of your quilt.
If you still have to choose your fabric, read our guide on Best Quilt Backing Fabric. Choose a fabric that corresponds to the colors used in the quilt top. For beginners, I recommend using high-quality quilting cotton, although other options are discussed in the article.
Calculate Quilt Backing
You will have to figure out how much fabric you need for the quilt backing. We have a great in-depth post that will show you how to calculate and piece quilt backing.
And, in this day and age, you know there must be a digital quilting app to help you with the tedious quilt math.
Our quilting calculator app will do all the quilt math for you with a click of a button. And the good news is – the quilt backing calculator is completely free!

Quilt Geek’s handy Quilt Backing Calculator and Fabric-Saving Backing Calculator calculate the best layout for your backing – depending on the quilt dimensions and the WOF you’re using.
It even provides an illustrated diagram to help you with the piecing!
Learn more about Quilt Geek’s 20+ calculators and charts here or get started right away:
Generally speaking, you want about 4 extra inches of fabric on each side of the quilt top. So once you’ve figured out the dimensions (again, use the Quilt Backing Calculator in Quilt Geek to help you out), piece together the pieces using a ½’’ seam allowance. Press the seams and the backing fabric to remove any wrinkles.
Tip: Make a Scrappy Quilt Backing
If you want to get creative with your backing, we’ve got some great creative backing ideas you can try. Noone says the backing needs to be one fabric only! Just look at this scrappy quilt backing on our patchwork quilt:

Step 8: Prepare the Batting
Batting is the middle layer of the finished quilt and it is what gives the quilt that soft cuddly feel. When choosing what type of batting to use there are different things to consider, so I suggest you read our guide on how to choose batting for a quilt.
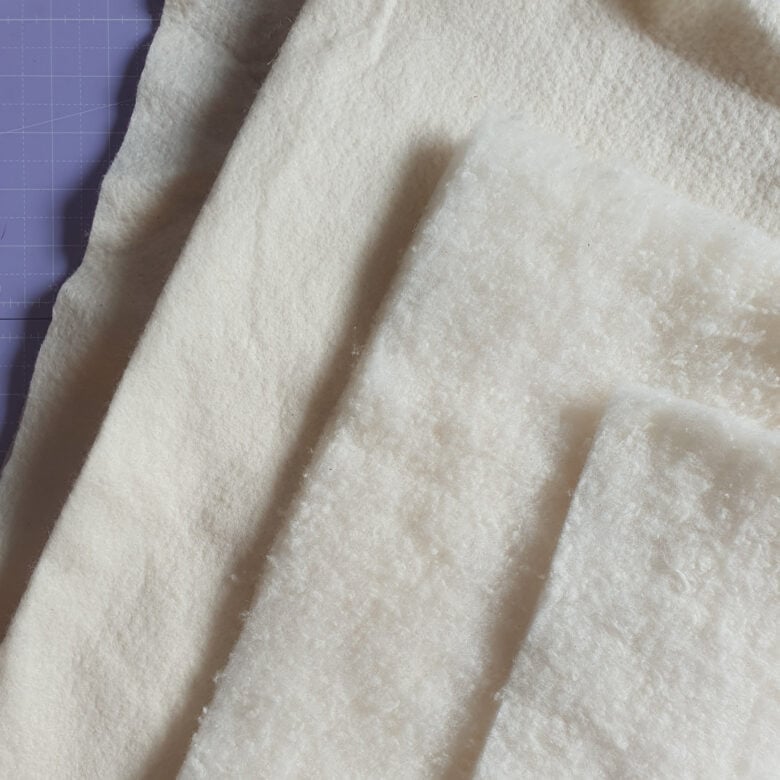
To quickly sum up, 100% cotton batting is a good natural choice. You also can’t go wrong with an 80/20 batting (80 % cotton and 20% polyester). It gives you most of the great natural properties of cotton batting at a lower price point.
Batting that you buy in a store is usually much wider than backing fabric, which means that generally, less piecing should be required. Most of the time (for reasonably sized quilts) you’ll only need one (wide) piece of batting cut to the right dimension.
Again, we have a very handy quilt batting calculator, which can help you figure out the required dimensions for your specific quilt top.
Keep in mind that you’ll want your batting to be a bit larger than your quilt top (but slightly smaller than the prepared backing fabric).
Step 9: Baste the Quilt for Quilting
If you plan to send your quilt out for long-arm quilting, you can skip this step.
Otherwise, you will now make the so-called quilt sandwich. This means you will lay out the backing fabric, the batting, and the quilt top. You will temporarily secure them together to keep them in place while quilting.

There are different ways you can do this: using curved safety pins, using a basting spray, or thread basting. All of these are described in detail in our Quilt Basting Tutorial.
To sum it up, here are the steps to baste a quilt:
- Lay out the backing fabric on a large, flat surface, wrong side up. Smooth out any wrinkles or bumps.
- Place the batting on top of the backing fabric, smoothing it out to eliminate any wrinkles or bumps.
- Lay the quilt top on top of the batting, right side up. Again, smooth out any wrinkles or bumps.
- Starting in the center of the quilt, use safety pins or basting spray to secure the layers together. Work your way out towards the edges, spacing the pins or spray every few inches.
- Once the entire quilt is basted, check for any wrinkles or puckers and adjust as needed.
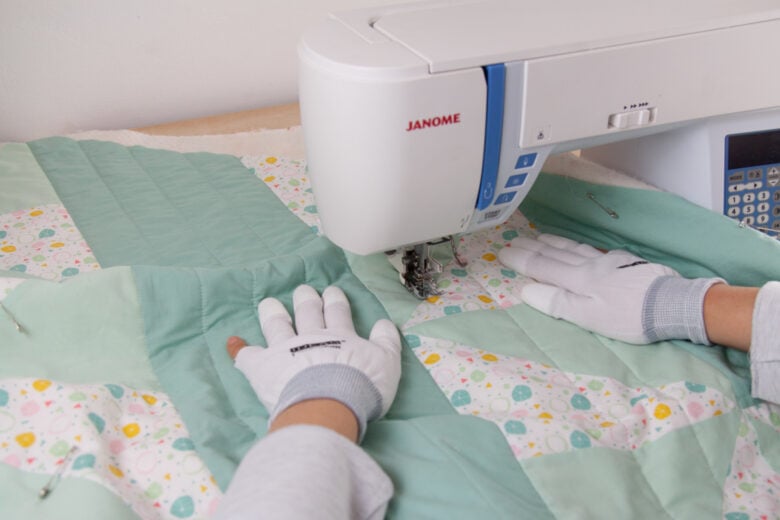
Step 10: Quilt
Many quilters decide to send out their quilt tops to be professionally quilted by a longarmer. This of course saves a lot of time and usually gives you beautiful results. If you choose to go that path then this step (the actual quilting) will be done for you. I recommend you ask your longarmer about how you need to prepare the layers of your quilt, so you get best results.
If you’ve decided to quilt at home, there are two options: machine quilting and hand quilting.
Option A: Machine Quilting on a Domestic Sewing Machine
For machine quilting, I urge you to use a walking foot for your sewing machine. This is a special attachment that allows the layers of fabric to run smoothly through the machine and prevents bunching and wrinkling (which you’ll almost certainly get with a regular presser foot, so do not attempt!!). We wrote a whole article about the walking foot, what it is, and how to use it, so check that out to get a better idea of this handy little tool.
The design of the quilting (how the quilting lines will go) is completely up to you, however, if you’re a beginner, I recommend using a simple linear design with parallel lines going from one side of the quilt top to the other. We have a whole article with 11 straight-line quilting designs that I think are very inspirational and will give you some great ideas.
Another option is using the piecing lines on the quilt top and follow those with your quilting. This technique is called stitch-in-the-ditch quilting. I often use it in combination with straight-line quilting.
The process of machine quilting might seem intimidating, but it gets easier every time you do it. If you’re a complete beginner, I highly recommend reading our tutorial on how to machine quilt for beginners. We go into all the details there. But just to give you a feel of how things go, here are the basic steps for machine quilting on a domestic sewing machine using a walking foot:
- Select a thread color and thread your sewing machine with a quilting thread.
- Attach the walking foot to your sewing machine.
- Set your machine to a medium to long stitch length.
- Starting in the middle of the quilt, stitch straight quilting lines from one edge of the quilt to the other. Work your way from the middle of the quilt towards the right edge of the quilt creating quilting lines that are about 1-2 inches apart.
- When you reach the edge, take the quilt out of the machine and rotate it 180 degrees. Now repeat the same process on the other half of the quilt towards the other edge of the quilt.
- Remember to stop and adjust the quilt sandwich periodically, smoothing out any wrinkles or puckers.
Option B: Hand Quilt
Another option is to hand quilt or hand tie the quilt sandwich. This can add a beautiful, handmade touch to your quilt. If you decide to try hand quilting, I recommend checking out some youtube tutorials to get an idea of the process.
This is a traditional technique that takes quite a lot of practice to master, however here are the basic steps to get you started:
- Select a thread color and thread your needle with a quilting thread. Use a quilting needle, which has a small, sharp point and a long, thin shaft.
- Tie a knot at the end of the thread and begin quilting in the center of the quilt. Use a quilting hoop to hold the quilt taut and make it easier to work with.
- Stitch along the seam lines, or create your own quilting design. Use small, even stitches, about 1/8 inch apart.
- Keep your stitches even and consistent throughout the quilt, and be sure to stitch through all layers of the quilt sandwich.
- When you reach the end of the thread, tie a knot and start a new thread. Be sure to tie a knot securely at the beginning and end of each thread to prevent unraveling.
- Continue quilting until the entire quilt is quilted to your liking.
Step 11: Square up the quilted Sandwich
After you’ve quilted your quilt, you can trim off the excess batting and backing fabric to get a perfectly even quilt. If you’ve squared up the quilt top before starting the basting process, this should be fairly easy, as you will only need to follow the edges of the quilt top.

Lay out the quilt sandwich on a cutting mat. Using a long quilting ruler and a rotary cutter, trim the excess batting and backing fabric from the edges of the quilt sandwich. Align the ruler with the quilt top and trim away any excess fabric or batting, being careful not to cut into the quilt top.
Check that the corners of the quilt sandwich are square. Use a quilting ruler to measure and trim any corners that are not 90 degrees.
Step 12: Bind the Quilt
This is the very last step of the process of making a quilt. Binding a quilt is adding a strip of fabric around the edges of a quilt (kind of like a frame). This covers the raw edges of the quilt sandwich and creates a neat finish to your quilt.
There are different techniques for binding a quilt, but no matter which you choose you will first need to make a binding strip. The process of making a binding strip is described in detail in the How To Make Binding For A Quilt tutorial, along with a handy Quilt Binding Size Chart.
To figure out how much fabric you need to make your binding strip, make sure you use our Quilt Binding Calculator.
Once you’ve sewed your binding strip, it’s time to attach it to the quilt sandwich. Here you can choose to do everything by machine – if you do that, follow our Machine Binding Tutorial for beginners.

Another option is to sew the binding strip to one side of the quilt by machine and then finish the binding on the other side by hand.
Whichever technique you choose, you should be left with a perfectly bound and finished quilt. Yaaaay! So exciting, especially if it’s your first!
Now that you’ve finished your quilt, you can go ahead and give it a nice wash to get that gorgeous wrinkly quilty texture (read our tutorial on how to wash your quilts). Then wrap yourself in your new quilt with a cup of coffee and enjoy!
Advanced Quilting Techniques
When you’re learning how to make a quilt for the first time, it might be a good idea to stick to the basics. But after you’ve finished a quilt or two, you might want to look into some more advanced quilting techniques. There are plenty of different ways to speed up the process or make it more accurate. And as a quilter, you’ll probably keep learning new techniques as you go and that’s part of the fun.
Here are some of the most useful quilting techniques you can add to your quilting ‘toolbox’.
Scant 1/4” seam Allowance
If you use quilting patterns in your sewing, you’re bound to come across the ‘scant’ quarter inch seam allowance. It’s one of those things that sounds super complicated but is actually very simple once you understand it.

We will hear us talk about the scant 1/4” seam allowance all the time. That’s because it’s THE thing that can take your piecing form ok to perfectly accurate.
We have an excellent article where we explain why you should use a scant 1/4” seam allowance and how you can make sure you’re actually sewing with a scant 1/4” seam allowance. Read about this magic technique here: What Is A Scant 1/4 Inch Seam Allowance For Quilting?
Strip Quilting (or Strip Piecing)
Strip quilting is a quilting technique where fabric strips are sewn together to create a ‘strip set’. This strip set is then cut into smaller units (or ‘segments’) that are used for piecing a quilt block. This method is efficient for creating repetitive patterns or blocks that involve long, straight seams.

The great thing about strip piecing is that it can really speed up the process of making the quilt top. Not only that, it can also add accuracy which is especially important when you have to match lots of points and seams.
Read all about this useful technique in our Strip Quilting Tutorial.
Chain Piecing
Chain piecing is a quilting technique that involves sewing a series of pieces together in a continuous “chain” without cutting the thread between them.
It’s a time-saving method because it eliminates the need to stop and start the machine for each individual piece. It also helps maintain a consistent seam allowance and ensures that pieces are sewn together accurately.

This method is especially useful when you have many identical or similar pieces to sew together. It comes in super handy when making a simple patchwork quilt or when making a block-based quilt top (where you sew several same-sized blocks together).
I hope this (kind of long) tutorial has shed some light on how to make a quilt from start to finish. It’s a lot to describe in one article, but I think it’s nice to have an overview of all the steps, especially for beginner quilters.
If there’s something that you feel I’ve missed or should have described in more detail, please let me know in the comments below. Otherwise, I hope you now have all the information you need to make that first quilt!
Happy quilting!

Finish Your Quilt Effortlessly
Quilt Geek calculates every measurement you need, so your quilt turns out perfect every time.
START YOUR 7-DAY TRIAL FOR $0!
Cancel anytime.


About The Author
Ula | Designed to Quilt