Chain piecing in quilting is like magic! Learn how to chain piece rows in quilting and speed up your quilt top piecing process.
We quilters are a funny bunch. We love sewing more than anything but look for any way possible to speed up the quilt making process.
But I am all for it. I love all tricks that help speed up the sewing process. (By the way, have you tried strip piecing? Super useful!). It helps me get to the next project quicker (and just ask Barbara, there are many next projects in our studio haha).
That’s why today we’re gonna look into another one of these magic quilter secrets – chain piecing. It might seem complicated at first, but trust me, once you get the hang of it, you’ll be using it anywhere you can.
I’ll begin by explaining some of the basics of chain piecing and why I think you should incorporate it in your own sewing. Then, I’ll show you how to chain piece rows step by step on a simple quilt with squares.
What is Chain Piecing?
Chain piecing is an awesome technique in quilting that allows you to sew multiple fabric pieces or blocks together quickly and efficiently. Traditionally, we sew together pieces in pairs (two at a time), but with chain piecing, we take it a step further.

In chain piecing, you sew together several fabric pieces (or blocks) one after the other in a continuous chain, without cutting the thread in between. This creates a chain of interconnected pieces that you keep adding to until you’ve sewn together all your pieces. (Don’t worry, I’ll explain everything step by step in a bit.)
By eliminating the need to cut the thread between each set, you can sew with ease and maintain a smooth rhythm. It not only speeds up the piecing process but also helps keep everything organized.
When to Use Chain Piecing?
Once you master the art of chain piecing, you’ll want to use it all the time. I say use it whenever you can. This is either:
- to sew together quilt blocks when working with ‘grid-based’ quilt blocks. An example of such a block would be the Ohio star quilt block, where you have a 3-by-3 grid that you need to sew together.
- to sew together rows and rows to form an entire quilt top. We used it for example in our simple patchwork quilt and our herringbone quilt (both free patterns!).
The latter is where I think chain piecing really shines. It speeds up the process significantly, which means you’ll be putting those quilt tops together in no time.
Why should I Chain Piece?
There are so many benefits to chain piecing, so I really recommend using it whenever you can. Some of the reasons to chain piece are:
- It’s time-saving: Chain piecing allows you to sew multiple pieces together in a continuous line without stopping to cut the thread between each piece. This can significantly reduce the time spent on sewing.
- It saves thread: It might seem insignificant, but those little thread tails add up. By not cutting the thread between pieces, you save thread that would otherwise be wasted.
- It helps you keep accurate seams: Chain piecing helps maintain consistent seam allowances throughout the quilt. Since you sew continuously, there are fewer chances of shifting or misalignment between pieces.
- It helps keep everything organized: In chain piecing, you can quickly move from one piece to the next. This eliminates not only the need to stop and start frequently but also helps you not mix blocks up or sew wrong pairs together.
- It reduces thread tangling: When you chain piece, the thread remains connected between the fabric pieces, reducing the chances of tangling or knotting.
Have I convinced you yet to try chain piecing? Let me show you how!
How to Chain Piece Rows?
I’ll explain chain piecing row on a simple baby girl quilt top, made entirely from squares. This is actually a quilt we made for the Simple Quilt with Squares tutorial.
While an all-squares quilt is the most obvious contender for chain piecing, remember you can use this technique for all kinds of quilt tops. Whether your basic pieces are just rectangular or square fabric pieces (like in our example), simple (half square triangles, flying geese, quarter square triangles,…), or more complex (bear paw, Ohio star, etc.) quilt blocks. Whenever you have a quilt top that is constructed in a grid, chain piecing is the way to go.
Tools Needed for Chain Piecing:
Materials for Chain Piecing:
How to Chain Piece Step by Step:

Arrange your fabric squares in the desired layout. Use a design wall for this or a large flat surface. (For the purposes of this tutorial, I’ll use some illustrations to hopefully make things clearer.)

We’ll start by sewing together the fabric pieces in columns 1 and 2. Starting from the top left corner, we’ll sew each square from column 1 to their neighbor in column 2.
Prepare the pieces for sewing by laying each neighboring pair right sides together. This means you’ll take the piece from column 2 and lay it over the piece in column 1. Repeat this for all your rows.

Starting at the top left corner, take the pair of squares from row 1 and place it on top of the pair in row 2. Now, take this stack onto the pair in row 3, and so on, until you’ve stacked all of the pairs.
You can clip the stack on the side (see the cute little yellow clip in the video) where you need your seam to be, so you don’t get confused when you take the stack to the sewing machine. (Especially helpful when working with directional prints.)
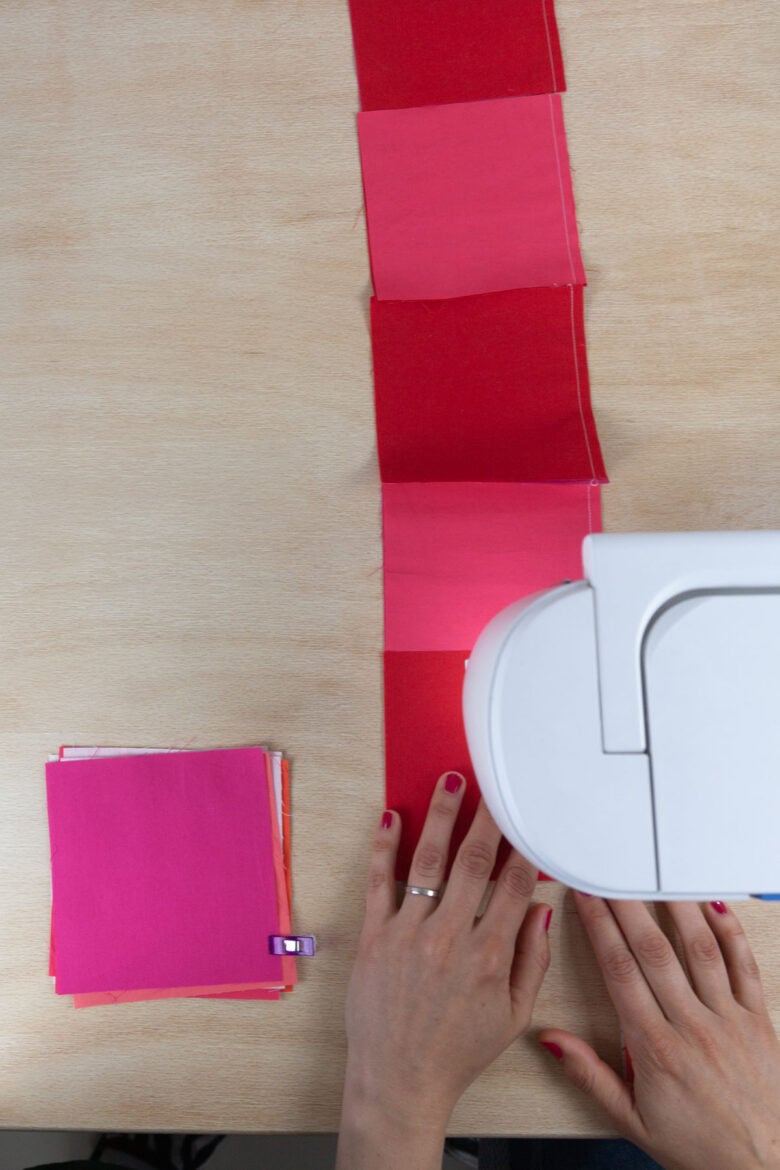
Take the stack to your sewing machine. Starting from the top of the stack, take the first two pieces and sew them together. Don’t cut the thread! Instead, place the next two squares from the stack under the presser foot and continue sewing with the same piece of thread.
Repeat until you’ve used up all the pieces in the stack. You’ll end up with a continuous chain of two-and-two fabric pieces sewn together.

Now that we have our basic chain, we’ll begin adding pieces to each row, starting with pieces from column 3.

Starting from the top, stack the pieces in column 3: take the square from row 1 and place it on the square in row 2. Now, take this stack onto the square in row 3, and so on, until you’ve stacked all the squares in column 3.
Again, you can clip the stack to mark where you need the seam to be.

Take the stack and the continuous chain to your sewing machine. Starting from the top, sew a square to the chain (if working with prints or similar, make sure you lay the pieces right sides together!). Don’t cut the thread in between. Instead, keep adding squares to the chain until you’ve sewn on all the squares.

Repeat steps 6 and 7 for all the remaining columns. When you’ve mastered the logic behind chain piecing, you can actually merge all these steps together, and stack ALL the pieces at once. But for a beginner, I recommend doing it column by column, as it helps you keep control over things.
After you’ve sewn all the pieces together, you’ll get this funny-looking curtain of fabric pieces.

Using your iron, press the seams. I recommend pressing each row in the opposite direction – this will make your seams nest. So if you press seams in the first row to the right, press them to the left in the second row, then again to the right, and so on.
This step is optional and will depend on the layout of your quilt top. Generally speaking, if you’re working with a grid (like we are here), there’s no need to cut the threads between rows (although some may prefer to do it anyway).
If you plan to add sashing or other elements between the rows, now’s the time to snip those connecting threads.

All that’s left to do now is sew the rows together. If you want, you can pin the rows together before sewing. Or if you’re like me, just wing it and hope for the best.
Make sure you nest the seams when sewing the rows together.
Press the row seams open or to the side (I almost always press everything to the side) and admire your beautiful quilt top!

This is it, my quilty friend! You’ve just learned how to chain piece rows and hopefully made a beautiful new quilt top in the process.
If you want to make a simple quilt top with squares, like the one we made in the tutorial, check out our simple quilt with square tutorial for some additional tips.
And if you just want to finish your quilt top, we’ve got a bunch of useful tutorials to help you along the way:
Further Reading
Finish a Quilt in 3 steps
If you’re new to quilting and you’re overwhelmed with how to make a quilt from start to finish, here are the 3 basic steps to finish your quilt with links to useful tutorials:
Comprehensive beginner-friendly tutorial: How to Baste a Quilt >
You might also like:
How to choose backing for a quilt >
How to plan and calculate quilt backing >
The magic diagonal quilt backing >
20+ modern pieced quilt backing ideas >
How to choose quilt batting >
Comprehensive beginner-friendly machine quilting tutorial: Machine Quilting for Beginners >
You might also like:
Inspiring Straight Line Quilting Designs >
The Ultimate Stitch in the Ditch Tutorial >
Comprehensive beginner-friendly machine binding tutorial: The Ultimate Machine Binding Tutorial >
You might also like:
How to get perfect quilt binding corners >
Stitch in the Ditch Quilt Binding (Looks Hand-Sewn) >
How to fix wavy binding >
Happy quilting!

Finish Your Quilt Effortlessly
Quilt Geek calculates every measurement you need, so your quilt turns out perfect every time.
START YOUR 7-DAY TRIAL FOR $0!
Cancel anytime.


About The Author
Ula | Designed to Quilt