Learn all about quilting by machine for beginners. This step-by-step walking foot machine quilting guide will teach you everything you need to know to start quilting at home!
Quilting is one of the final steps of making your quilt. It’s the step that comes after basting and right before binding the quilt. There are different ways you can quilt your quilt: either by hand tying it, sending it off to a longarmer, or machine quilting it with a walking foot.
Quilting by machine for beginners can sometimes feel a bit overwhelming. And I totally get why many beginner quilters are kind of daunted by machine quilting at home. But let me reassure you, it’s actually not that hard. And it’s perfectly doable, even for a beginner quilter.
Let’s learn about machine quilting!
This post contains affiliate links. Learn more here.
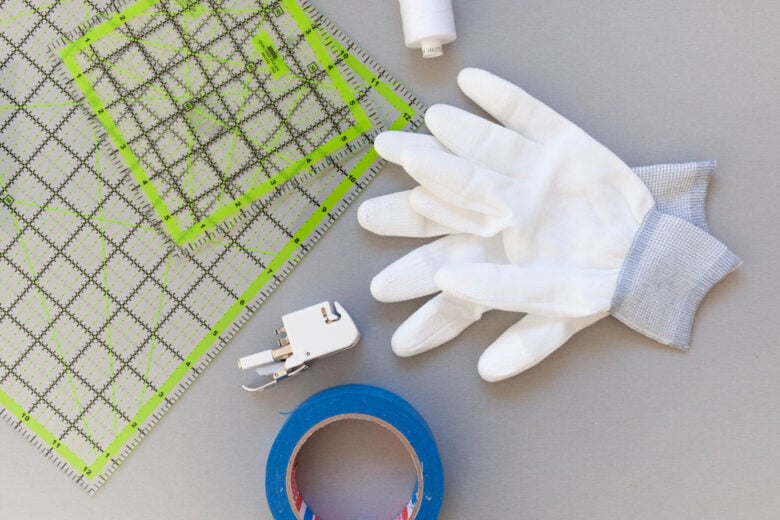
Tools and Supplies for Machine Quilting
Many of the tools needed for machine quilting are the basic quilting tools that you need for all steps of making a quilt. These include:

Sewing machine
A sewing machine is the main tool used for machine quilting. It should be capable of sewing through multiple layers of fabric and batting.
A helpful (but still optional) feature to have on the sewing machine is a needle-down function. The needle-down function keeps the needle down (I know, very unexpected) after you finish each stitch. This enables you to rotate the quilt as you’re machine quilting it without having to secure the stitches and deal with where to start the next stitch. If your machine has that feature, that’s great. But even if you have a more basic sewing machine you can work around it by manually lowering the needle after each stitch.
Sewing machine needles for quilting
Use a needle that is strong enough to go through the multiple layers of fabric. I usually use an all-purpose 80/12 needle for quilting. If the quilt sandwich is very thick I recommend using a 90/14 needle. If you’re buying needles specifically for quilting, you can get special quilting needles, which have a slim, tapered point and slightly stronger shaft for stitching through multiple fabric layers and across intersecting seams.
Thread
Choose a high-quality thread that is strong and won’t break easily. Cotton or polyester threads are popular choices.
Quilting rulers
Depending on the quilting design you choose, you might need to use quilting rulers a lot or not at all. I often use the piecing of the quilt top as the guide for my quilting (instead of marking a registration line with a ruler and marking tool) and then use the guide bar to help me keep straight lines. In this case, I barely use the rulers in the quilting process.
Besides this, there are a few tools that you’ll need specifically for machine quilting and some of these (especially the first one) are indispensable:
Walking foot
A walking foot, also known as an even feed foot, is a specialized sewing machine foot that helps to feed multiple layers of fabric through the machine evenly. This is super important when machine quilting and that’s why I urge you not to try machine quilting without a walking foot!
We have an in-depth article on How To Use A Walking Foot For Quilting, and I recommend you start there if you’ve never tried quilting with a walking foot. We explain everything from how a walking foot works, how to install it, and how to sew with it.
Quilting gloves
Quilting gloves help to grip the fabric as you move it through the machine, making it easier to control the stitching. They are not absolutely necessary but can be very helpful once you get used to them.
Marking tools
I am not a fan of marking on fabrics. Perhaps I have yet to find the perfect marker, that would work well and not leave any residue. (If you’ve got tips, let me know in the comments!) That’s why I usually plan my designs so they need as little marking as possible.
Whenever marking is needed, I usually resort to two tools: a. Masking tape (or painter’s tape) works very well for marking long straight lines. And it leaves absolutely 0 residue (just make sure you don’t leave it on a quilt for more than a few days). Another great tool is a b. Hera marker – this is a hard plastic tools with a sharp edge that creates a crease when pulled on a piece of fabric. So instead of actually drawing on the fabric, you just ‘draw’ a (temporary) crease that soon fades. This type of marking is of course less visible, but in return, you’re 100% sure you won’t have any marks left on your finished quilt.
Quilt Clips
These clips are designed to keep your rolled quilt sandwich in place when you’re pushing it through the machine. You don’t need to buy these clips specifically – you can use any other type of clips that are large enough to hold the roll in place (like Beach Towel Clips or large spring clams).
Quilt Sandwich
Last but not least, you will need the quilt sandwich that you’re going to quilt. I’ll touch upon that in a bit, but we also have an in-depth guide on how to make a quilt sandwich, so I recommend you read that for all our best tips.
How to Machine Quilt for Beginners?
The process of machine quilting will depend somewhat on the design you choose for your quilting. I will explain the steps using a simple straight-line edge-to-edge design. However, most of the steps here apply to the walking foot quilting process no matter what type of design you choose.
STEP 1: Baste your quilt sandwich
Basting a quilt means attaching together the three layers of the quilt sandwich: backing, batting, and the quilt top. For a detailed tutorial on how to do this, read our quilt basting tutorial. But to give you a quick overview here are the steps to baste your quilt:
- Start by taping your backing fabric to a flat surface (floor or large table) wrong side up. Masking tape works well for this. Make sure the fabric is taut, but not stretched.
- Layer on your batting and finally, the quilt top – right side up.
- Using basting pins, baste the three layers together.
For good machine quilting results, you need to make sure you baste your quilt well. This means ironing out any wrinkles from the quilt top and backing (and even batting, if your batting was bunched up somewhere before use).
Make sure you use enough pins if pin basting (which is my favorite, as I feel like it’s the only way you make sure the layers are really well attached). If spray basting, do your thing, but make sure you don’t skimp on the spray. You want everything nice and smooth and well attached!
STEP 2: Mark the quilt
Use the marking tool of your choice to mark the quilting design onto the quilt top.
You can use the piecing lines of the quilt top as the guide for the first (‘registration’) line. Make the first stitch by stitching in the ditch (that means right along the seam line). Then, to keep a consistent distance from this first line, make use of the guide bar on your walking foot.
Alternatively, use a piece of painter’s tape to mark the first (‘registration’) line and then proceed with the guide bar as described above.
If you prefer, you can also draw all the quilting lines with your chosen marking tool. I rarely do this, because I find using the guide bar is much much faster.

STEP 3: Roll up your quilt
Roll up your quilting and use quilting clips or something similar to hold the roll in place. This will help you guide the quilt sandwich through the sewing machine, especially when dealing with a larger quilt.
In the picture above you can see how I rolled up my Gift Wrap quilt to guide it through the machine.

STEP 4: Begin quilting
Starting in the center of the quilt, begin sewing along the marked central line of the quilting design. (See diagram above.)
Guide the quilt sandwich smoothly through the machine and make sure you’re always supporting the weight of the quilt. If you let the weight of the quilt drag it down (towards your lap or towards the back of the machine), it will pull it towards or backward creating uneven stitches.
Starting and Stopping the Stitch
If you’re using an edge-to-edge design, you don’t have to worry about starting and stopping the stitch. Begin quilting on the batting (about an inch away from the quilt top), continue across the quilt top, and then finish the line on the batting on the opposite side of the quilt. Securing your stitches is not necessary. The stitches will be secured when you attach the binding.
If your quilting lines start or stop in the middle of the quilt top, you’ll need to use the knot and bury method or the tiny stitch method to secure the start or end of the stitch. That’s why, especially for beginner quilters (and lazy advanced quilters like me), I recommend choosing an edge-to-edge design.
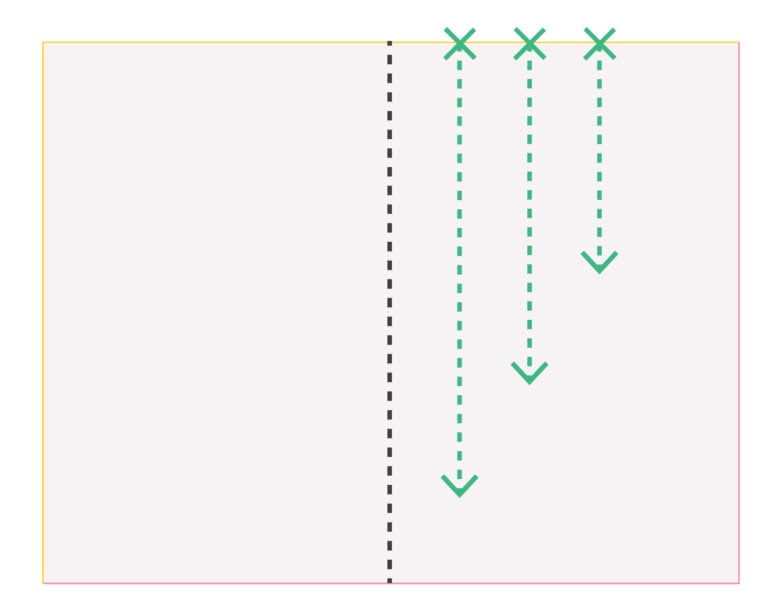
STEP 5: Continue quilting toward the edge
Using the guide bar as a guide or following the marked quilting lines, continue quilting towards the right edge of the quilt. Always begin your quilting stitch on the same side of the quilt as shown in the diagram. Do not change the direction of the quilting lines, as this can produce puckering.
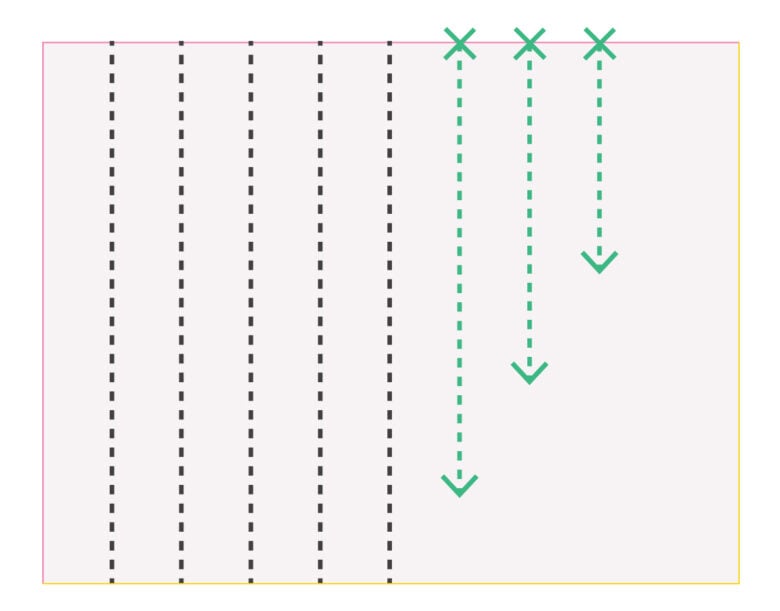
STEP 6: Rotate and quilt the other half
Once you’ve come to the edge of the quilt, take it out of the machine. Rotate it 180 degrees and repeat the entire process on the other half of the quilt. Again, you’ll be starting at the center of the quilt and working your way out toward the right edge. Continue quilting until the entire quilt is quilted.

STEP 7: Add additional quilting lines (optional)
You can stop here and you’ll have a lovely matchstick quilting design.
However, you can keep using the same technique to add additional quilting lines to create different designs.
For example, if you want to do a crosshatch quilt design, simply continue the process by turning the quilt 90 degrees and repeating everything on the other side of the quilt.
Contrary to what you may think, there is actually a great variety of simple straight-line edge-to-edge designs. We’ve created a super inspiring guide on Straight Line Quilting Designs that you can create with your walking foot. I recommend you check that out just to get inspired!
Tips for Quilting by Machine for Beginners
Here are some tips for quilting by machine for beginners, but also experienced quilters.
Tip 1: Use a Walking Foot
I’ve said this before and I’ll say it again – don’t try machine quilting without a walking foot. The layers might bunch up, you’ll get puckers all over and all sorts of tension problems. It’s just not worth it.
I recommend consulting your sewing machine user guide to see exactly how it’s done for your specific machine. Additionally, follow our step-by-step guide on How to install a walking foot here.

Tip 2: Install the Guide bar
When you’re installing your walking foot you might notice there’s an extra attachment to the whole contraption. It’s a thin metal measuring bar that can be attached to the walking foot, called the guide bar. It helps you keep a consistent distance from one (previous) stitch to another (the stitch you’re currently sewing). I really like using it as it minimizes the amount of marking needed to quilt the quilting design, which saves quite a lot of time. That’s why I recommend you attach the guide bar, as well.
On my Janome Skyline S5, I simply slip the guide into the opening at the back until it ‘clicks’ in place. I need to push it quite hard to get it to the ‘click’ position, so don’t be too gentle or it will keep falling off.
Tip 3: Set the Proper Stitch Length for Machine Quilting
The stitch length for machine quilting can vary depending on the type of quilt and the desired effect. I usually sew with a 2.5 to 3.0 stitch length, but that depends on the effect I am trying to achieve. If you are stitching in the ditch and you want your quilting to disappear into the ditch, use a smaller stitch length (and consider using a finer thread).
Tip 4: Make a test piece
As always when trying to determine the best machine settings, I recommend experimenting with some scrap quilt sandwiches. This will help you to determine the best stitch length for your specific project and machine. And also check that the chosen thread and needle work as you expect.
Tip 5: Baste your quilt well
I’ve mentioned this before, but make sure you baste your quilt well. You don’t want any puckering. You want your layers to be flat and secured.
And that brings us to the end. I hope this guide has managed to show you that machine quilting is not something you need to be afraid of. And it’s definitely something you can do!
It will not just save money, but also allow you to express yourself through quilting, as well. It can actually be really fun, so I hope you try it out someday soon! And if you do, don’t forget to let us know how it went!
So go get your 10.000 daily (walking foot) steps in and get quilting!
How to Machine Quilt FAQs

Finish Your Quilt Effortlessly
Quilt Geek calculates every measurement you need, so your quilt turns out perfect every time.
START YOUR 7-DAY TRIAL FOR $0!
Cancel anytime.


I have had great results using tailors chalk . I typically quilt on the back of my quilts and use a light touch with the chalk. I’m nervous about using rulers, but am going to try it soon. Loved your article!
I’ve only used a regular square piece of tailor’s chalk so far but felt like the markings weren’t accurate enough. I have been eyeing a chalk lead set (where you insert a chalk lead in a plastic cartridge), and you might have given me a nudge to go ahead and try that 🙂 Thanks for the tip!
Thanks so much for sharing this. It is a great reference. I
We’re glad it helps!
I first met you at the QuiltedSummet. This was a great article and I learned a lot from you in both places. Keep the information coming as it is helping me learn. I am starting my 3rd quilt today!
Julianne, we’re happy to hear you’re finding it useful – comments like your is why we keep doing what we do! Let us know if you need help with anything!
Thanks for the tips. I have been quilting for 10 years —largely self taught — and I only do my own machine or hand quilting. Learned a lot from this article. Thanks. Please provide links to products other than Amazon. Like many others, I have stopped shopping at Amazon given its complicity with the Trump administration. Of course I would prefer you not link anything to Amazon, but if it benefits your company to add their link, please also give quilters like me an alternative source.
Hi Mary, thanks for your comment. You’ll be happy to hear that we’re just in the process of removing Amazon links from the site, but it will take a while until everything is updated… Happy quilting!