Looking for a modern version of the traditional log cabin quilt pattern? Browse these gorgeous geometric log cabin quilts and learn how to make modern variations of a log cabin quilt block!
Log cabin quilts are among the most popular traditional quilt patterns. They can be made using a single large block or smaller pieced blocks, both of which create a striking visual impact.
The log cabin block is simple enough for beginners to create, yet it offers such versatility that it can be a challenge even for advanced quilters. Without a doubt, it is a timeless source of inspiration for all quilters. We’ve put together a simple tutorial on how to make the log cabin quilt block and included examples of its contemporary variations. Don’t miss our selection of modern log cabin quilt patterns to fire your heart up!
What Is A Log Cabin Quilt Block?

A log cabin quilt block is a traditional block, known for its simplicity and versatility. It’s named after the traditional log cabins, where each layer of logs was added to the structure to create a home. The quilt block mimics this construction process by using strips of fabric to form concentric squares or rectangles, representing the logs.
The block is typically pieced using a center square (representing the hearth or the fireplace of the cabin) with strips of fabric (representing logs) added to each side. As each “log” is added, the block grows outward, creating a concentric pattern.
One side of the block is usually made with light-colored strips, representing the sunny or warmer side of the cabin, while the other side is made with dark-colored strips, symbolizing the shaded or cooler side. This contrast gives the block its distinctive appearance.
How To Make A Log Cabin Block?
In this tutorial, I will show you how to make a classic log cabin quilt block. We will make the 14 x 14” finished block with three rounds (three squares around the central square) of 2” stripes.

Required Tools:
Materials:
Color A (central color)
Color B, D, F (light side)
Color C, E, G (dark side)
A Log Cabin Block Step-By-Step Tutorial:
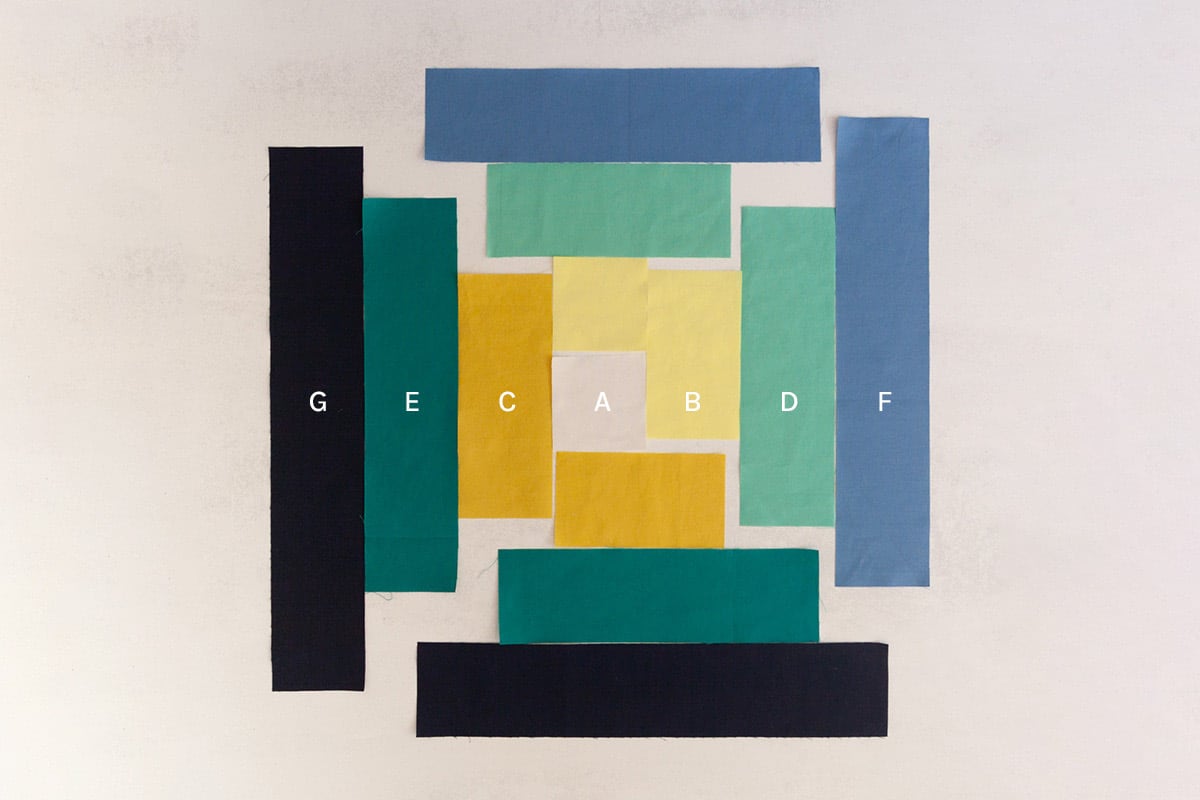
Cut fabrics to get the following pieces:
Color A (1) 2 ½ x 2 ½”
Color B (1) 2 ½ x 2 ½”
(1) 4 ½ x 2 ½”
Color C (1) 4 ½ x 2 ½”
(1) 6 ½ x 2 ½”
Color D (1) 6 ½ x 2 ½”
(1) 8 ½ x 2 ½”
Color E (1) 8 ½ x 2 ½”
(1) 10 ½ x 2 ½”
Color F (1) 10 ½ x 2 ½”
(1) 12 ½ x 2 ½”
Color G (1) 12 ½ x 2 ½”
(1) 14 ½ x 2 ½”
Alternatively, you can cut one long 2 ½” strip and cut it to the required length as you build the block.

Sew together both 2½ x 2½” squares. Keep the square in color A (center) on the left.

Sew the 4½ x 2½” rectangle in color B to the bottom of the unit from the Step 2.

Sew the 4½ x 2½” rectangle in color C to the left side of the unit from the Step 3.

Sew the 6½ x 2½” rectangle in color C on top of the rectangle from the Step 4.

Keep adding aditional pieces referring to the diagram to get the final log cabin block, as shown on the photo above.
Log Cabin Quilt Block Variations
As I’ve mentioned earlier, this classic block is a canvas for your creativity. Here, you’ll discover some great variations that will for sure inspire modern quilters like yourself.
Below you will find some ideas for block variations, but don’t hesitate to mix and match colors and prints, play with various strip widths or block sizes – the outcomes truly are stunning.
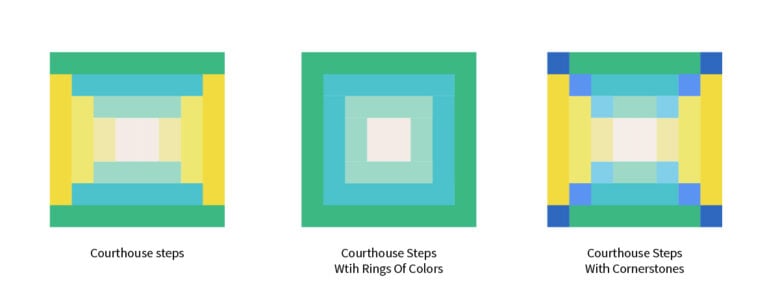
Courthouse Quilt Block
The Courthouse quilt block is one of the most known variations of the log cabin quilt block. Its arrangement of strips creates the illusion of a central “courthouse square” surrounded by a series of logs or strips, giving it a timeless and traditional look. The block itself offers different arrangements resulting in eye-catching designs.
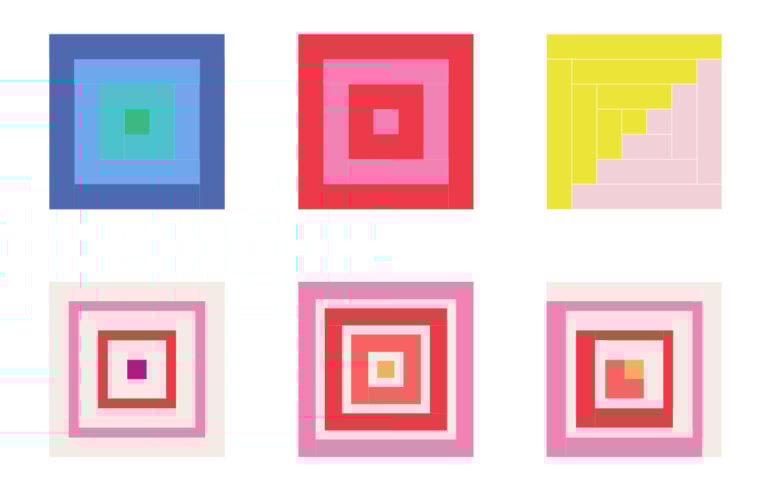
Off-Center and Quarter Log Cabin Block
Speaking of impressive results, I absolutely adore these variations of the block. The Off-Center Log Cabin version brings together two different stripe widths, creating a modern asymmetrical look and an off-center composition. On the other hand, the Quarter Log Cabin brings the center to the very corner of the block, which emphasizes the geometric composition even more.

Play with the width of the strips and color arrangements
The log cabin block is very often made using 2” finished strips and has three ‘log’ rounds, resulting in a 14 x 14” finished block. The 2” width matches the size of a jelly roll, which can save you some cutting time. But since we’re talking about block variations, don’t hesitate to experiment with different strip widths to put your own spin on the log cabin block. If you go for wider strips, you’ll make a bold visual statement, especially if you want to show off your fabric prints. On the flip side, using narrower strips will give you a more intricate design.

Have some fun experimenting with various fabrics and colors to achieve striking results. If you’re feeling adventurous, take it a step further by trying different strip widths and colors. Additionally, get creative with how you arrange the strips to produce a wide range of patterns within the block.
Now that you’ve learnt all about this gorgeous classic quilt block, get inspired by these great log cabin quilt patterns!
20+ Contemporary Log Cabin Quilt Pattern Ideas
The following log cabin quilt patterns offer a modern twist on this traditional pattern and its block variations. Some stick to the traditional composition with stunning modern colorways, while others introduce an abstract redefinition of the log cabin quilt pattern itself. Explore these fantastic modern log cabin quilt variations!

Log Cabin Block on a Sweatshirt
This isn’t a typical log cabin quilt pattern, but since we just covered how to make a log cabin block, why not turn it into a fun small quilting project? This log cabin quilt block on a sweatshirt is quick to sew and the perfect way to wear your quilting skills with pride!

Desert Cabin Quilt by Yellow Tree House
This contemporary spin takes the classic log cabin quilt block to the next level. The symmetric arrangement of four blocks creates a strong visual impact. A great choice if you are looking for a geometric modern pattern.

Rocking Chair Quilt Pattern By Modern Charm Stitchery
What I love about this Rocking Chair Quilt is that it takes its inspiration from the classic log cabin block, although you might not spot it right away. There are two color choices available: an ombre colorway for a super modern feel and a three-tone version that holds onto a bit of tradition. Choose the one you’re drawn to the most!

Cabin Nights Quilt Pattern By Prarie Quilt Co
This pattern isn’t only based on the log cabin quilt block, but I really like how modern it turned out bringing together three traditional blocks – the log cabin, the sawtooth star, and the bear paw quilt block – to create an engaging and modern quilt design. I’m sure making it is enjoyable and snuggling under even more.

Log Jam By Pieced Just Sew
This playful pattern is crafted using the same simplified quilt blocks, resulting in a minimalistic style that’s just right for modern quilters. The pattern is perfect for experimenting with block orientation, so although you’re starting with the same block you can get (at least) three different outcomes. It is a jelly roll and fat quarter friendly pattern, so great to use up those fat quarters!

Upwards by Paigie Puddles
The Upwards quilt is an awesome modern and geometric take on the classic log cabin quilt block. The clever use of negative space adds a unique element and gives it a contemporary appearance. A great example of the log cabin quilt pattern turned modern!

Cabin Valley Quilt Pattern By Cotton And Joy
Isn’t this modern take on the log cabin block just stunning? Instead of the regular center square, Fran from Cotton and Joy used a half-square triangle block, and it truly transformed the whole design. We love it!

Snow Cabin By Lo And Behold
Here’s another contemporary variation of a log cabin quilt pattern using the half-square triangle block technique. The design is named Snow Cabin, yet it’s not limited to being just a winter quilt. If created with vibrant, lively colors, it can resemble a field of tulips. The result is truly stunning!

Cabin Fade By HoffMama Company
I’m really impressed by how this modern log cabin quilt pattern creatively uses colors and varying widths for the ‘logs’. The different orientations of the blocks form a composition with an optical illusion. Easy to make and with a powerful visual impact!

Campfire Quilt Pattern By Suzy Quilts
The Campfire quilt takes the traditional log cabin block and adds sashing, resulting in a stunning modern look. It’s the ideal pattern for minimalist quilters who love geometric design and stripes.

Hum A Few Bars By Mary Go Round Quilts
How gorgeous is this modern log cabin quilt pattern? Stripy logs in this fresh vibrant colorway make it a perfect summerish quilt!

Sunshine Cabin By Kindred Quilt Co.
This charming mini 18×18” quilt pattern with a log cabin block at its center will add a touch of brightness to your home. It is a go-to for a fast quilting project or a last-minute gift.

Reverberance By Shannon Fraser Designs
If you’re interested in experimenting with solids and prints, this generously sized log cabin block is an excellent option. The broader stripes will make your prints truly shine and catch the eye!

The Heart of the Home Log Cabin Quilt Pattern by Simple Simon & Co.
This log cabin quilt pattern is a great example of how versatile this classic design is. I admire the playful twist Elizabeth from Simple Simon & Co. brought to this quilt with scraps. True to its name, each block features a red center, symbolizing the heart of the home.

Modern Log Cabin Baby Quilt by Simple Simon & Co.
You’ll likely agree that Elizabeth is a pro at transforming scraps into eye-catching quilts! The bold stripe composition creates a catchy geometric pattern. While designed as a baby quilt (32×36”), you can easily enlarge it by adding a border. No need to fret over quilt math – our border calculator has you covered!

Granny Cabin Quilt Pattern by Then Came June
I love the simplicity of the modern twist Meghan from Then Came June did to the log cabin quilt pattern. And another great addition – the pattern utilizes strip piecing method which speeds up the process!

Rectangle Log Cabin Quilt Pattern by Bonjour Quilts
I like the story behind this log cabin quilt pattern. Kristy from Bonjour Quilts wanted to clear out her scrap bin and create a twin-size quilt, but she faced a challenge – square blocks didn’t quite meet her needs of the quilt size. Cleverly, she redesigned them into rectangles. She shares this pattern for free!

Threshold Log Cabin Pattern by Art Gallery Fabrics
Here’s another log cabin pattern that’s perfect for using up scraps! I’m loving the arrangement of fabric colors. The contrast between the dark and light sides of each log cabin block creates striking diagonals. Despite the variety of colors and prints, the clever color arrangement results in a bold geometric quilt pattern that every modern quilter will adore.

Christmas Tree by Cluck Cluck Sew
Look at this fun (and clever!) twist on the log cabin block. Quilt yourself a Christmas tree with this beginner-friendly pattern, perfect for using precuts or scraps!

The Bonnie Quilt Pattern by Kitchen Table Quilting
I love the modern twist in this log cabin pattern and the color scheme that Erica from Kitchen Table Quilting chose. The pattern comes in 5 different sizes and is perfect for using precuts!

Clogged Quilt Pattern by Wooly Petals
Have you noticed? This vibrant heart quilt pattern is actually a modern twist on the classic log cabin design! With options in two different block scales, it’s a fantastic choice for every modern quilter.

Scrappy Pineapple Quilt Block Tutorial by Aunt Em’s Quilts
I couldn’t resist adding this eye-catching quilt pattern to our collection of modern log cabin quilt patterns. Even though it’s not a typical log cabin quilt, it still follows a similar approach by adding logs around the central square, resulting in a stunning design. Dive into Em’s video tutorial and learn how to make it yourself!

Circus Log Cabins Quilt by Stitched in Color
Rachel from Stitched in Color named this fun log cabin quilt pattern after circus tents. Here’s her summer version, along with a suggested winter color bundle and some other fantastic color combinations. I love how she used bigger scraps for piecing the quilt backing.
I’m sure you can see why this classic pattern is so well-loved, and I bet you agree it’s pretty amazing. I hope these modern log cabin pattern and block ideas have given you a creative boost, and you’re excited to make your own log cabin quilt. If you make one, we want to hear all about it in the comments below!
Further Reading
Finish a Quilt in 3 steps
If you’re new to quilting and you’re overwhelmed with how to make a quilt from start to finish, here are the 3 basic steps to finish your quilt with links to useful tutorials:
Comprehensive beginner-friendly tutorial: How to Baste a Quilt >
You might also like:
How to choose backing for a quilt >
How to plan and calculate quilt backing >
The magic diagonal quilt backing >
20+ modern pieced quilt backing ideas >
How to choose quilt batting >
Comprehensive beginner-friendly machine quilting tutorial: Machine Quilting for Beginners >
You might also like:
Inspiring Straight Line Quilting Designs >
The Ultimate Stitch in the Ditch Tutorial >
Comprehensive beginner-friendly machine binding tutorial: The Ultimate Machine Binding Tutorial >
You might also like:
How to get perfect quilt binding corners >
Stitch in the Ditch Quilt Binding (Looks Hand-Sewn) >
How to fix wavy binding >

Finish Your Quilt Effortlessly
Quilt Geek calculates every measurement you need, so your quilt turns out perfect every time.
START YOUR 7-DAY TRIAL FOR $0!
Cancel anytime.


Hello! I am desperately searching for a pattern for a Quarter Log Cabin quilt. I saw one somewhere online in blues and want very badly to make it for one of my sons. I can’t find that blur one anywhere nor can I find a pattern. I could probably figure it out, but would rather not
Hey Cathy, I don’t know the pattern you’re talking about, but I’m sure if you take it one block at a time, you’ll do great. Perhaps the easiest way would be to go with jelly rolls. Start with a 2.5×2.5 inch square for the corner square and then just build with jelly roll strips around that.