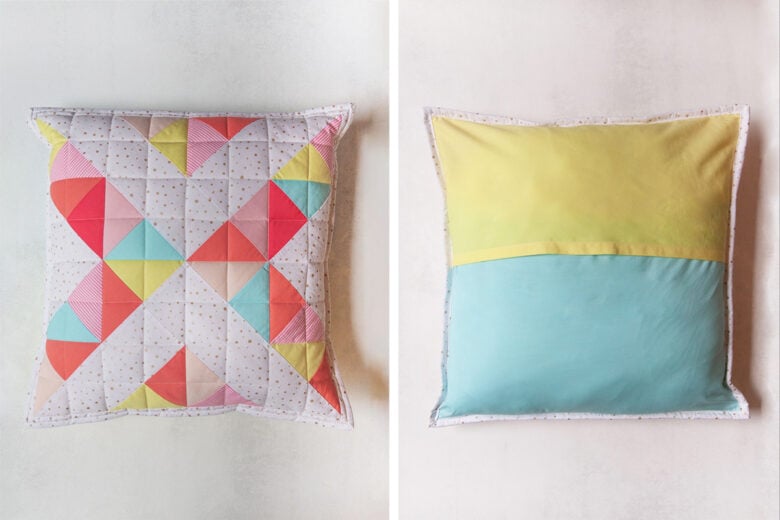
Learn how to make a quilted pillow case with no zipper required! A fun and easy tutorial for perfect quilted pillows every time!
Sometimes you just want a quick quilting project. Maybe you need a handmade gift ASAP or maybe getting that WIP (work in progress) that you’ve got sitting in the corner basted and quilted is just too overwhelming at this exact moment.
I get it. I’ve been there. And let me tell you. Quilted pillows are just what you’re looking for.
They’re fun, they’ll scratch the quilt-piecing itch, AAAND your quilts that are waiting to be finished won’t be giving you any judgmental looks for starting yet another quilt. OK, maybe they’ll have an opinion, but they won’t be saying it out loud, after all – it’s just a pillow, right?
How to Make a Quilted Pillow Case?
The first part of the quilted pillow-making process is pretty much the same as making a quilt. You’ll start by making a quilt top. There are many quilt patterns written specifically for a pillow-size quilt top (18×18’’ is probably the most common). You can use any of these or just play with the pieces to create your own design.
Sometimes I use leftover blocks from a quilt and mix them with fabric scraps from my stash. The sky is the limit here, so have fun with it.
How do you Finish a Quilted Pillow?
Of course, the fun doesn’t end here. When making a quilted pillow you will need to finish it somehow. This means turning the pretty quilt top into an actual pillowcase. And that’s what we’ll be looking into today (it took me a while to get here haha).
There are many different ways to finish a quilted pillow, but today we’ll take a look at what we find is the easiest – the no-zipper pillow case.
Because there’s no zipper sewing required we think this is the most beginner-friendly method for making a pillowcase. So if you’ve got the sewing skills to make a quilt top, you can definitely make this pillowcase, as well.

How to Make a Quilted Pillow Case with No Zipper?
The tutorial below will teach you how to make a no-zipper quilted pillowcase for a standard 18’’ x 18’’ pillow insert. This is what many pattern designers (including us) use in their patterns. With some basic math skills, you can easily adjust the dimensions to fit a different size pillow insert.
You will see the tutorial calls for muslin. This can be pretty much any (preferably cotton) fabric that you will use as the backing of the quilt top. This muslin layer will end up hidden inside the pillowcase and won’t be visible on the finished pillow.
No-zipper Quilted Pillow Case Supplies:
No-zipper Quilted Pillow Case Supplies:
We are using two different colors (blue and yellow). Of course, you can the same fabric for both pieces, if you prefer.
Quilted Pillow Case Tutorial:

Make a quilt sandwich using your muslin fabric, batting, and quilt top. Baste as desired. See our Basting tutorial for more information.
Machine quilt as desired. You can follow our Machine Quilting Tutorial for Beginners.

Fold the longer (18 1/2”) edge of the smaller backing rectangle ½” twice. Pin the double-folded edge in place and crease it with a hot iron. Repeat on the longer (18 1/2”) edge of the larger backing rectangle.
Using your sewing machine, topstitch the edges.

Lay out your pieces wrong sides together (pretty much the way they will be when the pillowcase is finished), this means:
– lay your quilt sandwich wrong side up,
– lay your larger backing rectangle right side up (blue), align the raw edges with the edges of the quilt sandwich,
– lay your smaller backing rectangle right side up (yellow), and align the raw edges with the edges of the quilt sandwich).
Clip the pieces in place and sew a 1/4″ seam around the perimeter of the pillow case.

Sew the 2 ¾” binding to the pillow using your favorite quilt binding method (you can follow our Machine Binding Tutorial). Use a seam allowance of about ⅜”.
We recommend using a 2 ¾” binding for pillowcases simply because of the added stress to the seams on a pillow case compared to a quilt. So while we almost always make 2 ¼’’ binding strips for our quilts, we use wider strips for pillows.

Voila, your quilted pillow case is finished. All you need to do now is insert an 18’’ x 18’’ pillow insert and you are done!
Now we want to hear from you! Do you like making quilted pillows or is it something you’ve never really tried? Is there another method you use for making your pillow cases? We want to hear all about it in the comments bellow.


