Learn how to cut bias binding and how to make bias binding for quilts. We’ll show you 3 methods to making bias binding and also how to sew bias binding on a quilt!
If you’ve been sewing quilts for a while, I’m sure you’ve come across bias binding (or single fold bias binding) at one point or another.
The truth is, you can get away with sewing regular straight-grain binding for most rectangular or square-shaped quilts. (We teach you how to make straight-grain binding in the How To Make Binding For A Quilt tutorial.) We use straight-grain binding all the time and it works like a charm for most projects.
However, when dealing with curves or irregular shapes, bias binding is a must. I’ll explain why this is in a bit (and you can also read about it in our article: The Cut on the Bias Explained). But first, let’s get to why we’re here: making bias binding!
Bias Binding Materials and Tools
To make bias binding, you will need the following tools and materials:
- Fabric (we’ll show you how to calculate the required amount in a bit)
- Iron
- Rotary cutter with a sharp blade and/or scissors
- Cutting mat
- Quilting ruler(s)
- Sewing machine
- Quilt – quilted and squared
Step 1: Calculate Bias Binding
Before you learn how to make bias binding for quilts, you’ll need to calculate how much fabric you need for your quilt dimensions. When calculating the fabric requirements for bias binding things tend to get a bit tricky, as we’re dealing with diagonals.
Option A: Use the Quilt Geek app
Lucky for you, we know exactly how overwhelming quilt math can get. That’s why we created Quilt Geek, the ultimate quilting calculator app.
So instead of banging your head against the wall trying to figure out how much fabric you need for your bias binding, use Quilt Geek’s bias binding calculator and it will do the math for you!
We offer a free trial, so you can do the calculation for your current project with no charge at all!

Quilt Geek’s handy Bias Binding Calculator calculates the exact starting square size required to make binding for your project.
Just enter the required binding width and length and get the calculation done in seconds!
Learn more about Quilt Geek’s 20+ calculators and charts here or get started right away:


Option B: Bias Binding Chart
Although Quilt Geek’s bias binding calculator will do all the work for you, I know some of you prefer a chart you can print out or keep on your phone. You know we thought of that, as well.
We have a very handy bias binding chart that will tell you exactly how much fabric you need for different lengths of bias binding. It tells you the starting fabric square needed to cut the required bias binding length – I will explain how exactly you do this in a minute.

We almost always use 2 1/4” wide binding and that’s what the binding chart is calculated for. If you want to use a different binding width or need a different binding length, use Quilt Geek’s bias binding calculator!
So how do you get this chart? Easy! Just sign up for our newsletter and we’ll send you the chart as a welcome gift!
Step 2: Cut Bias Binding
As you’ll see in a bit the process of making bias binding is actually very similar to making straight-grain binding. However, the very important difference is in the cutting.
Instead of cutting fabric strips along the grain (as you would for straight-grain binding) you need to cut fabric strips at a 45-degree angle. There are 3 different (slower and quicker) methods of doing this and I’ll show you each step by step.
Method #1: Continuous Bias Binding – Tube Bias Binding Method
I’ll start with what I think is the quickest and most user-friendly method. It’s one of those magic methods that we quilters have up our sleeves. It uses a trick or two to create a continuous bias binding strip. So with this tube bias binding method, you won’t need to join binding strips, as they’ll already come out joined in a long bias strip.
You will need a square piece of fabric for this, so if you’re working with a fat quarter for example, cut it into a square first (see Method #3 on how to do this).
Use Quilt Geek’s bias bining calculator to figure out the required size of the starting square.


STEP 1: Cut your square in half
Go from one corner to the other (along the diagonal)


STEP 2: Sew the two triangles together
Flip the left triangle over the right triangle, so they are right sides together. Align the edges and pin them in place. Sew with a ¼’’ seam allowance (along the dashed line in the first picture). Open and press the seam. You will get a rhombus shape.

STEP 3: Mark the strips
On the backside of the rhombus, start marking the desired width of the strips ( 2 ¼’’ in our case).
The markings should run parallel to the longer side of the rhombus. Mark the entire surface. (Yellow lines in the picture.)

STEP 4: Cut away excess fabric
If there’s a strip narrower than the desired width of binding left, cut it away with scissors. (Quilt Geek’s bias binding calculator takes this into account, so don’t worry about the final binding length!)

STEP 5: Draw the seam lines
Draw seam lines ¼’’ from the two shorter edges of the rhombus (yellow lines in the picture).


STEP 6: Align the edges for sewing
Bring together the two shorter edges of the rhombus (right sides together). Align the markings so they are offset by one width. The end of one side should line up with the first mark on the other side (see picture).
Insert a pin where the binding marking intersects the seam line you drew. Guide the pin through the two layers of fabric so it comes out at the binding marking and seam line intersection on the other side. (The two intersections will form a joint point after you sew the tube together.)
Repeat on other intersections. Pin everything in place.
STEP 7: Sew the edge
Sew the edge along the seam line you drew (= a ¼’’ seam allowance). Open and press the seam.

STEP 8: Cut the continuous binding strip
Using fabric scissors cut along the markings you drew in Step 3. Continue until you’ve reached the other side of the tube. Voila! You now have a continuous bias binding strip.

Method #2: Cut Bias Binding from a Rectangle (Basic Method)
The most basic method of cutting fabric strips on the bias is simply placing your quilting ruler at a 45-degree angle and cutting strips at this angle. This method can be used for both square and rectangular starting fabric pieces. While it is very straightforward, it is also probably the most time-consuming.
So I would only recommend using it when you want to start from a rectangle (and not a square) – because both other methods require a square to start off.

STEP 1: Lay out your fabric. Place the quilting ruler at a 45-degree angle. Here is how I do this: I use my largest ruler (6” x 24”) and align the 45-degree line (I put a piece of red washi tape on the line so you can see better) with the edge of the rectangle.
STEP 2: Cut along the edge of the ruler.

STEP 3: Using a long quilting ruler, cut 2 ¼’’ strips parallel to the diagonal you cut in Step 2. Do this on both sides of the diagonal until you’ve cut up the entire surface.
Method #3: Cut Bias Binding from a Square
Fortunately, there are methods to speed things up and this binding strip from a square is one of them. You can use also use this method to make binding strips from fat quarters (you’ll just need to cut away some excess fabric at the beginning as fat quarters aren’t completely square).
Use the bias binding calculator to figure out the required size of the starting square.


STEP 1: Cut a square fabric piece
First, we want to make sure we’re working with a square piece of fabric. Take the bottom left corner of your fabric and fold it over the diagonal to the top edge. If there’s no excess fabric on your right, that’s perfect. If there is, cut the excess away.

STEP 2: Cut along the diagonal
Using fabric scissors cut the square in half along the diagonal fold.

STEP 3: Fold the triangles in half along the bias edge

STEP 4: Rotate and clean up the cut
Rotate the folded triangles and line up the edges with the lines on your cutting mat. Cut away the raw edge on the left to get a clean starting cut. Make sure this cut runs perpendicular to the bottom folded edge.


STEP 6: Cut strips
Cut 2 ¼’’ strips parallel to the clean cut. Continue cutting until you’ve reached the corner of the triangle (the last strip will most likely be too short to use).
Step 3: Join Bias Binding Strips
After you’ve cut your bias binding strips, you’ll need to sew them together to get one long continuous binding strip. Unless of course, you used the first method, in which case the strip is already sewn together.
When joining bias binding strips, you pretty much follow the same method as with straight grain binding strips.

Step 1
Lay two strip ends right sides together at a 90-degree angle. Use the ends (which are cut at a 45-degree angle) as a guide. Place the ends so you have about a ½’’ tip hanging over on each side. Pin in place.

Step 2
Sew the strips together from one corner (where the two strips meet) to the other.

Step 3
Trim away the dog ears (the little triangles coming from under the strip).

Step 4
Press the seam open.
Step 5
Continue adding additional bias strips using steps 1-4.
Step 6
Fold the continuous binding strip wrong sides together and press. You’ll get a long binding strip that you can use to bind your quilt or other projects.
Bias Binding FAQ
What Does Cut on the Bias Mean?
When referring to fabric, cutting on the bias means cutting the fabric at a 45-degree angle to the grain or straight threads of the fabric. The grain refers to the direction of the threads running parallel to the selvage edges of the fabric.

Cutting on the bias has a significant effect on how the fabric drapes and stretches. It allows the fabric to have more elasticity compared to cutting along the straight grain.
You can easily test this on any piece of fabric. Pull along the threads of the fabric and you’ll see that the fabric barely stretches. Now, pull at a 45-degree angle and you’ll see there’s much more give.

This is why in our patterns and tutorial, we always give you a heads-up when dealing with pieces that are cut on the bias (usually triangles). Because the bias cut is so stretchy, it is important that you handle the pieces carefully to keep them from distorting. And if sewing them together, use lots and lots of pins!
On the other hand, this tendency to warp is what we WANT when making bias binding. The stretchiness of bias binding strips is what makes them lay beautifully along curves and irregular edges.
We look into the bias cut in detail in our article: The Bias Cut Explained.
What is bias binding for quilting?
Bias binding is simply a fabric strip that is cut on the bias (45-degree angle to the grain) used to enclose the raw edges of a quilt or quilted project.
The bias cut allows the binding to have more flexibility and stretch than if it were cut along the straight grain. This flexibility is particularly useful when binding curved edges, as it allows the binding to wrap smoothly around the curves without puckering or distortion.
In quilting, we usually use bias binding that’s folded in half along the length of the strip. This just means that when making the binding tape, you will only fold and press it once. This makes a strong 2-layer binding, that’s perfect for quilt edges which typically get a lot of wear and tear.
How to Sew Bias Binding on a Quilt?
After you’ve created your bias binding tape, you’ll want to sew it on your quilt.
Sewing bias binding on a quilt is no different from sewing straight grain binding on a quilt. We have a great tutorial you can follow: Machine Binding for Beginners. It will take you through all the steps needed to sew the binding on your quilt.
Seeing that you’ve gone through the trouble of making bias binding (and not straight grain binding), I’m guessing you’ve got curves or irregular shapes to bind.
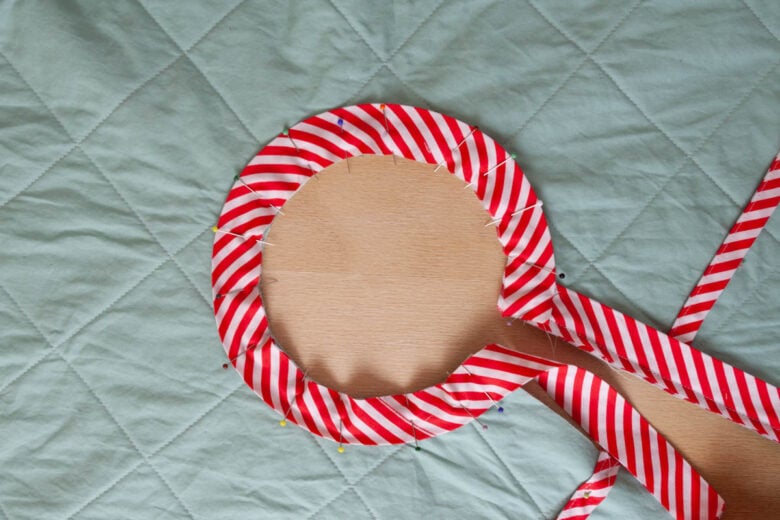
Again, the process is pretty much the same for curves as well. One thing I would recommend is pinning along the curves A LOT (like I did on my Christmas tree skirt you see in the picture). That will keep the binding in place as you sew around the curved edge.
And that’s it! Now you know how to make bias binding for quilts and how to bind your quilt even if you’re dealing with curves or strange shapes.
Do you have any other bias-binding tips you can share? We’re all for new quilting magic tricks!

Finish Your Quilt Effortlessly
Quilt Geek calculates every measurement you need, so your quilt turns out perfect every time.
START YOUR 7-DAY TRIAL FOR $0!
Cancel anytime.
Learning to do bias binding!
Awesome, it’s such a useful skill to have! You’ve got this 💪🧵