Follow our free baby quilt pattern and make this beautiful flying geese quilt for the special little human in your life. It comes together really fast and is an absolute eye-catcher!
A while back we were on a mission here at Designed to Quilt to study some of the basic quilt blocks and learn the best (fastest and easiest) ways to make them.
The first block we tackled was The Flying Geese Block. It’s such a great little block, no wonder it’s used in so many quilt patterns. But what I love about flying geese is how good they look when you really let them be the star of the whole show.
After writing the article and learning about the construction and calculations of the flying geese, I was inspired to put my new skills to the test.
Making The Free Baby Quilt Pattern
I wanted to make something for my 4-month-old just because – babies. But my main goal was to get some practice with my flying geese. So I came up with a simple little pattern that really lets the classic flying geese block shine.
After seeing how great it came out, we wrote up the cutting instructions and drew some diagrams, and we’re excited to finally share this free baby quilt pattern with you!
I guess the name is pretty self-explanatory. It’s an ode to the flying geese block and it’s a baby quilt. So when you put those two together flying goslings (or flying baby geese) is what you get.
I’m sorry if you thought it had something to do with Ryan Gosling. It does not. Although maybe some of you would prefer a quilt with a bunch of flying Goslings… I am digressing, I’m gonna stop right now.

How To Make The Flying Goslings Baby Quilt?
Dimensions of the Baby Quilt
When I came up with this pattern, I deliberately made it rather small. I wanted a baby quilt that we could use in the baby’s stroller. So the finished size of this quilt is 27,5″ x 32″.
As you can see the pattern is very modular, so if you would like a larger quilt, you could always add an extra row of flying geese.
But as I’ve said, the tutorial here will show you how to make a baby quilt that is 27,5″ x 32″.
Baby Quilt Supplies
Due to the small dimensions of this quilt, you will not need very much fabric for it. That’s why scraps work very well for this.
In fact, I made this whole quilt from fabrics I had left from other projects and an old Ikea baby bedsheet that we didn’t use anymore.
(If you’ve read my article on How to Choose Backing for a Quilt, you’ll know I’m all pro using sheets for quilting. Just make sure you follow the tips given in the article to choose the right kind.)
To make this quilt, you will need (see cutting chart for dimensions):
- Quilting cotton in 5 colors (colors A, B, C, D, and E)
- Quilting cotton for backing and binding
- Chosen batting (34″ x 38″.)

Here are two other color combos in case you need some inspiration. A girly one in pink and a more neutral minimalistic one in grey with a yellow accent. Aren’t they pretty?

I used a very light 100% cotton ‘batting’ for this, as I wanted something breathable that we could use in the summer. It was actually a large piece of burpcloth-like material that I got in a baby goodie bag, but never used. Because the batting is so light, the finished blanket is very thin, but I love how soft it feels, and would definitely recommend using it for a summer baby blanket.
We do have a whole article about How to choose batting for a quilt, so if you’re trying to decide what would be best, I recommend reading that first!
Cutting Chart
Once you have your materials ready, cut them following the cutting chart below.
| CUT | |
| Color A | (8) 4″ squares |
| Color B | (8) 4″ squares |
| Color C | (16) 2,5″ squares |
| Color D | (8) 4″ squares |
| Color E (FG centres + background) | (6) 7,5″ squares (4) 4,5″ squares (3) 24,5″ x 2″ (2) 24,5″ x 3,5″ (2) 32″ x 2″ |
| Backing | 34″ x 38″ |
| Binding | (4) 2,5″ x WOF strips (for total binding length 2,5″ x 130″) |
How to Make the Baby Quilt Top
First, you will make the flying geese:
- 8 (larger) flying geese in color combos A+E, B+E and D+E
- 16 (smaller) flying geese in color combo C+E
To make the flying geese, follow the 4-at-a-time flying geese method. (Both FG construction methods, 1 at-a-time and 4-at-a-time, are thoroughly described in The Flying Geese Block post.)
The method produces four identical flying geese at a time. This means you will have to repeat the process 10 times in total.
Each time you will need:
- 4 smaller squares in colors A, B, C, or D (4″ squares for the A/B/D+E color combos and 2,5″ squares for the C+E color combo)
- 1 larger square in color E (7,5″ squares for the A/B/D+E color combos and 4,5″ squares for the C+E color combo)
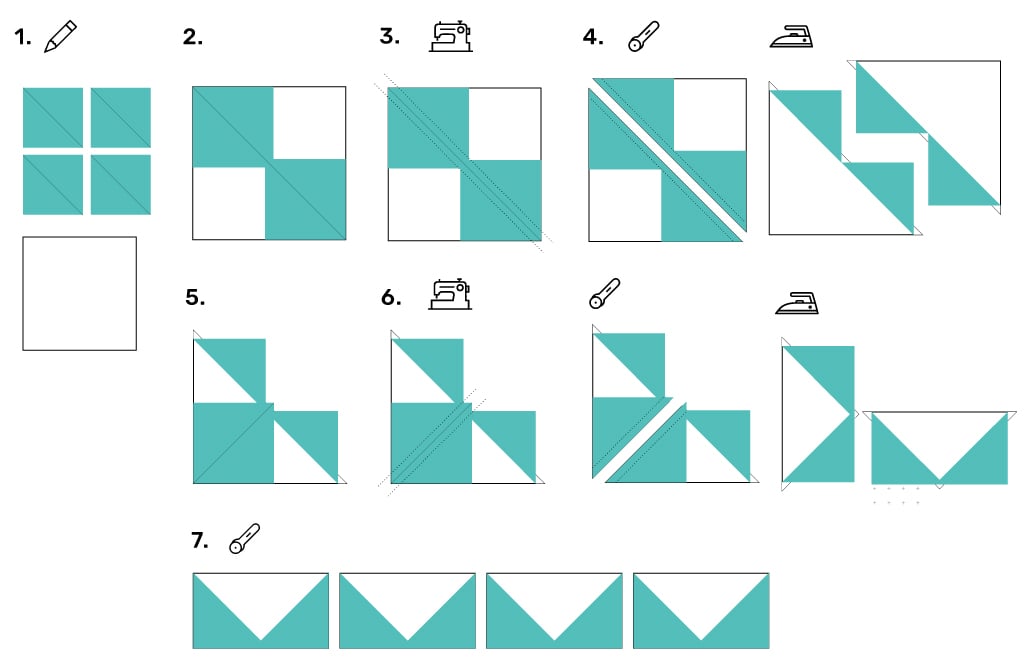
- Prepare four (smaller) squares in color A/B/C/D and one (larger) square in color E. Draw diagonal guidelines from corner to corner on the wrong sides of the small squares.
- Place two small squares on the opposite corners of the large square right sides together. The guidelines should now form a long diagonal guideline across both squares.
- Sew two seams, each a ¼” away from the guideline.
- Cut in half along the original guideline and press seams out. You now have two identical (almost heart-shaped) units.
- Place one remaining small square in the corner of the unit (with the guideline going towards the center of the unit).
- Sew two seams, each a ¼” away from the guideline. Cut apart (along the guideline) and press seams out.
- Repeat with the remaining (heart-shaped) unit and square.
- Trim your flying geese blocks to the desired unfinished block size (see chart below).
Repeat the process until you have the required number of flying geese in each color combo (see chart below for the total number of FGs needed).
| FG combo | Trim flying geese to | Total number of FGs |
| Color A + E | 6,5″ x 3,5″ | 8 |
| Color B + E | 6,5″ x 3,5″ | 8 |
| Color C + E | 3,5″ x 2″ | 16 |
| Color D + E | 6,5″ x 3,5″ | 8 |
Next, sew the flying geese in rows as shown in the diagram:

Now, attach the sashing and borders. First, sew together all the horizontal pieces.

And finally, attach the vertical strips.

That’s it! Your quilt top is finished.

How to Finish the Baby Quilt
If you’ve done this before, you know the drill, but in case you’re new, here are the steps with links to our favorite tutorials or how-to’s:
STEP 1: Make a quilt sandwich and baste the quilt.
Follow our tutorial on How to baste a Quilt).
STEP 2: Quilt.
If you’re doing this on your domestic machine, we’ve got a great tutorial for you: Machine Quilting for Beginners. I also recommend going through our Walking Foot Tutorial if you’re new to using a walking foot.
STEP 3: Attach binding.
There are different methods to doing this (aren’t there always?), but here is what we usually use: Machine Binding for Beginners. I would urge you to pin the binding as you go along to keep your binding from getting wavy.

Voila! Your gorgeous new blanket is finished. We really hope you liked this free baby quilt pattern. I had lots of fun making it and we use the blanket all the time. It warms my heart seeing my baby snuggle with it. I can’t wait to hear who you are making yours for!

Finish Your Quilt Effortlessly
Quilt Geek calculates every measurement you need, so your quilt turns out perfect every time.
START YOUR 7-DAY TRIAL FOR $0!
Cancel anytime.


Do you have a printable version to print? This is 16 pages long. With the line drawings of how to assemble/sew pieces, but not the large pictures of the quilt?
And if I wanted to extend the quilt to a twin size, how would I do that?
I love your patterns.
Thank you!
Hi, Martha. Unfortunately we don’t have printable versions of these free blog posts. You could try saving the line drawings as images (right click on the image + save as) and then printing each image individually. Hope that helps.
As for the twin size, I would just repeat the pattern until you get the desired size. Here’s some quick quilt math: this baby size comes out at 24×27 inches without the outer borders, so if you repeat it 9 times (3 times along the width and three times along the length) your quilt will come out at 72×84 inches. You can then add borders to get the exact desired size. If you make it, you have to let us know, we’d love to see it!
This is a quick mockup of how it would look:
To make a slightly larger quilt, I was thinking I’d make the flying geese and goslings a bit larger and setting them on the diagonal.
If I were going to make it twin size, I would place wider washing’s so it wasn’t so crowded with geese….maybe even have rows of geese shorter and staggered with more background to fill out the row.
Hey Candace, you can absolutely do that! There will be some more quilt math involved, but I’m sure it would look great. We have a handy flying geese calculator to help you with the FG math if you decide to go for it.
WOW The designs and directions are very clear and easy to understand. I’ve never done flying geese but I will give this one a try. Two family babies to quilt for is going to be fun. Thanks ladies.
Alice, thank you for your comment! We’re glad you find it helpful! And you should definitely give flying geese a go, they’re such versatile blocks. We’ve got some great tips for flying geese here: Flying Geese Tips.
Cute quilt but not convenient having the directions in this format. Need to have them able to be in a printable format to make it easier to follow.
Thank you! Unfortunately, we don’t have a printable PDF available at the moment, but it’s great feedback — we’ll keep it in mind for the future!