Learn how to make a basic square in a square quilt block two different ways. Follow our step-by-step tutorials and get the free square-in-a-square dimension chart for accurate finished blocks.
The square in a square quilt block is a traditional quilt block that is simple in its form but it might get surprisingly tricky to make.
It’s used in many different quilt patterns, so probably every quilter will come across it sooner or later.
To make things a bit easier, I’ve put together illustrated step-by-step tutorials for two different methods – a basic method and an advanced one. As usual, we’ve done the calculations for you and designed a free dimension chart to make sure you get the desired accurate outcome.
Let’s learn about squares (in squares)!
What is a square in a square quilt block?
A square in a square quilt block, also known as a diamond in a square or a square within a square, is a quilt block pieced from a square surrounded by four triangles. It creates the illusion of a smaller square nested within a larger square.

How to make a square in a square block? – 2 Methods
When it comes to making this quilt block, there are a few ways to go about it. I’ll show you the two different methods that give the most accurate results.
The first method is pretty straightforward. You’ll need one big square and four smaller ones, and we’ll sew them together to create the square in a square block. This method only requires basic sewing skills and is much more beginner friendly. The only downside is that it creates quite a lot of fabric scraps.
The second method is more efficient fabric-wise. It yields the same outcome. But instead of adding four smaller squares to the large one, you’ll be adding 4 triangles to the central square. Sewing triangles are what makes this method less beginner friendly, as it involves sewing on the bias. Therefore, I consider this method an alternative for advanced quilters.
Anyways, both methods have their pros and cons, which we’ll discuss in the step-by-step tutorials. You can give both a try to see which one suits you best. Let’s get started!
Basic Square in a square quilt block method (Beginner-friendly)
In this method, you’ll be sewing four smaller squares to each corner of the large square in the center.
Make sure you align the smaller squares carefully with the larger one and follow the drawn diagonal line. When you do this right, you’ll end up with a perfectly finished block.
Required Tools:
Materials:
Step-by-step Tutorial For Square-in-a-square block:

Cut all 5 squares to the desired size: (1) a large square (the center square) and (4) smaller squares (the corners).
See our Square in a square size chart.

Draw diagonals on the back side of each small square.

Place two small squares facing down in the opposite corners of the large square, as shown in the illustration above. Sew along the drawn lines.

Cut the excess fabric on each side, leaving a ¼” seam allowance. Press open.

Take the other two small squares and repeat the process in the remaining two corners. Cut the excess fabric and press it open.

Square your block to the desired dimension of your unfinished block. When placing your ruler, make sure you get a 1/4” seam allowance from each corner of the central square (see illustration).
Now, there’s one thing to keep in mind with this method. After sewing, you’ll have to cut off the corner on each side of the block. This means there’s some more cutting involved and you’ll also end up with some scraps. But hey, those scraps can also come in handy for a fun scrappy quilting project if you like!
Advanced Square-in- a-square block method (Fabric-saving method)
With this method, you’ll achieve the same result, but the process has fewer steps. Instead of using squares like in the previous method, you’ll sew triangles on each side of the large square. And this adds a bit of complexity to the process.
Sewing triangles on the sides of a square is challenging because the fabric is cut on the bias. This means it’s cut at a 45-degree angle to the fabric’s grain or straight threads. The bias cut gives the fabric more stretch and flexibility compared to cutting along the straight grain.
This means it can be difficult to sew a straight line, so only attempt this if you’re confident at sewing along the bias edge. I recommend trying one or two test blocks before diving into your actual project. As they say, practice makes perfect!
The biggest advantage of this method is that you won’t need to trim any corners, which means less fabric waste!

Step 1: Cut: (1) large square (the center square) and (2) smaller squares, sub-cut the small squares to (4) triangles (the corners).

Step 2: Mark the center point on the diagonals of the triangles and on all four sides of the square.
You can use a marking pencil and draw marking lines or use a hot iron and make creases.

Step 3: Place one triangle on the large square, right sides facing together and the edges aligned. Use marks or creases to center the triangle on the square.
I recommend pinning the center points.

Step 4: Sew the triangle on the square using a ¼ “ seam allowance. Repeat this on the opposite side of the square.
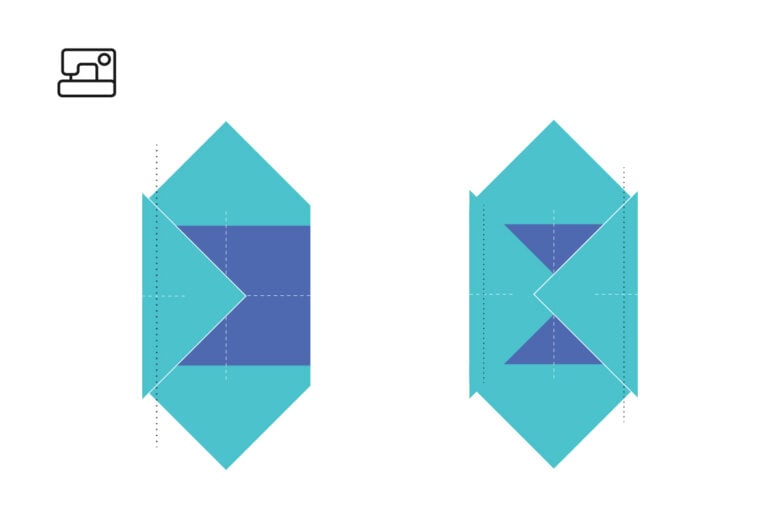
Step 5: Press open and trim the dog ears.
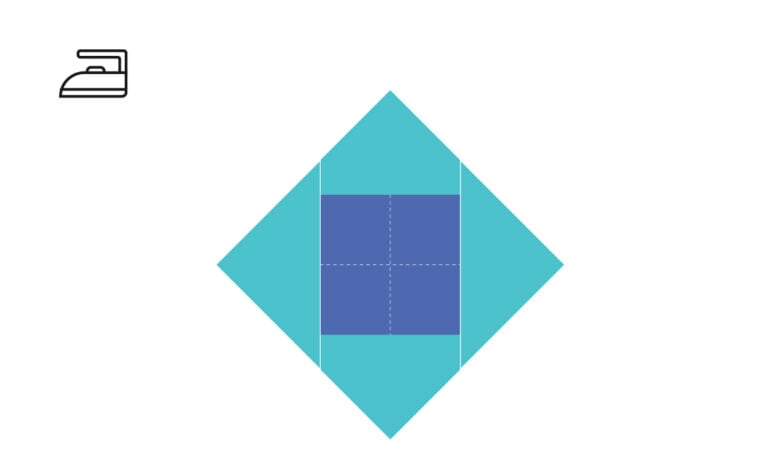
Step 6: Repeat Steps 3-5 on the opposite sides.

Step 7: Trim the block to the desired unfinished block size. When placing your ruler, make sure you get a 1/4” seam allowance from each corner of the central square (see illustration).
Square in a square quilt block chart
You might have noticed that we’re really into quilt math, especially with our handy calculators and dimension charts. Well, here’s some good news for you – we’ve already done all the square-in-a-square block calculations!
This square in a square dimension chart includes the starting fabric pieces required to make a variety of standard-size quilt blocks. And it even includes the construction method for both options, so you will always know how the pieces have to go together!
You can grab our free dimension chart for free by signing up for our newsletter below.
DTQ TIP: If you decide to make square in a square quilt top, you can use our ‘pieces to yardage’ calculator. It calculates the yardage you need for the required starting squares!
Now you have all the necessary tools to create a square in a square block on your own. Do you have any other tips for making a square in a square block? We’d love to hear all about it in the comments below!
Square-in-a-square quilt block FAQs

Finish Your Quilt Effortlessly
Quilt Geek calculates every measurement you need, so your quilt turns out perfect every time.
START YOUR 7-DAY TRIAL FOR $0!
Cancel anytime.


I don’t see where I can sign up for your newsletter “below”.
Hi Ann, there’s a red box with a picture of an ipad (with the freebie on the screen) and the signup form just below where it says ‘below’ 😄 If you don’t see it, please send us an email at hello@designedtoquilt.com and we’ll make sure you get it!